
Welcome to EnrollmentHive!
This documentation serves a deep reference to everything about EnrollmentHive.
This documentation is under construction and will be built out over the next several weeks. Let us know if you have any feedback or topics you would like to see covered deeper.
Setting Up Your Studio
This chapter is the studio-wide vocabulary and access you put in place before day-to-day work feels finished: who can sign in, what they can do, and the tags that keep classes and families organized year after year.
You will spend that time under Setup. Nearby pages (appearance, tuition, waivers, Stripe) matter too, but they are not covered here yet.
| Page | Start here when |
|---|---|
| Accounts | You need to understand what an account is, add staff, or invite parents |
| Roles | You need to decide what staff can see and change in the admin portal |
| Linking Instructors and Households | A login should belong to a teacher, a family, or both |
| Tags | You need parent registration filters, reusable labels, or automatic student/household tags |
Changing accounts and roles requires Manage staff and roles. Changing tags requires Manage studio settings. The studio owner always has both.
Accounts
An account is a person who can sign in. It is not a student, not an instructor profile, and not a household. Those are separate records you link when you need them.
That split is useful:
- A parent login can pay and register without being a teacher.
- A teacher can take attendance without being billed for anyone.
- The same person can be both: a front-desk parent who also teaches, or an owner whose own kids take class.
Billing, saved cards, and auto-pay live on the account. Students live on the household. See households vs accounts for the day-to-day billing side.
Where to Work
Open Setup, then Accounts.
Three tabs:
| Tab | Who is listed | What it is for |
|---|---|---|
| Organization Accounts | Anyone with a role, plus the Organization Owner | Staff who use the admin portal |
| All Accounts | Logins with no role (typical parents) | Family portal users, imported placeholders, instructor invites that do not have a role yet |
| Roles | The permission sets you assign | See Roles |
Click a row to open that person’s account page. Search works on the tables.
Assigning a role moves someone from All Accounts to Organization Accounts. Removing the role moves them back. The login is the same person either way.
Organization Owner
The person who created the studio is the Organization Owner (star icon). They have every permission, even without a role. You cannot replace that by assigning Admin to someone else — Admin is close, but the owner is always fully trusted.
You cannot delete your own account.
Creating a Staff Account
From Organization Accounts (or All Accounts), click Add Account.
| Field | Details |
|---|---|
| First name / Last name | How they appear in the studio |
| Their login. Must be unique. | |
| Initial Password | They can change this later. Reset Password also signs them out everywhere. |
| Role | Optional on the form, but they cannot use the admin portal until they have a role (owner excepted). |
Click Create new account.
Give teachers the Instructor role (or a custom one) and link them to an instructor. A role without the instructor link still opens admin, but “own classes” permissions have nothing to attach to.
Parent and Placeholder Accounts
Most family logins are created when:
- A parent registers on the public site
- You Add Account on a household (invite by email)
- You import accounts (they start as not invited)
On All Accounts, Unlock / Invite appears when some of those people cannot sign in yet.
| Action | What it does |
|---|---|
| Unlock | Lets them claim the account themselves (for example when they register). No email. |
| Invite | Emails a link to claim the account and set a password. |
| Send Invite / Unlock on the account page | Same idea, for one person. |
Until they are invited or unlocked, the account is a placeholder. You will see Not invited yet on their account page.
Editing an Account
On the account page:
- Edit Details — name, email, phone
- Edit Role/Links — role, household, and instructor on one form (same as the row menu: Edit role, Link to instructor, Link to household)
- Reset Password — sets a new password and signs them out of every session immediately
The page also shows whether they have Admin Portal Access (a role), Organization Owner, or Standard Account.
Deleting an Account
On the list, open the row menu and choose Delete account. Confirm.
Do this only when the login should not exist. Detach a household or instructor link if you just need to disconnect them from a family or teacher record.
Related
- Roles — what a role actually unlocks
- Linking Instructors and Households — connecting a login to a teacher or a family
- Charges and Balances — accounts as the people you bill
Roles
A role is a named bundle of permissions. If an account has a role, they can open the admin portal (the staff side of EnrollmentHive). If they have no role, they are a standard parent/student login: parent portal only.
That is the usefulness in one line: roles let you hire a desk manager, a teacher who only takes attendance, and a costume volunteer without giving everyone access to billing and studio setup.
The Organization Owner does not need a role. Everyone else who should work in admin does.
Default Roles
New studios start with two:
| Role | Meant for | What it allows |
|---|---|---|
| Admin | Owners, studio managers | Everything in the permission catalog |
| Instructor | Teachers | Looking around (classes, sections, students, households) and taking attendance. They can send communications and log their own time. They cannot edit pricing, enroll/drop, or change studio setup. |
Treat those as starting points. Duplicate the idea by creating a new role rather than overloading Admin for everyone.
Creating or Editing a Role
- Open Setup → Accounts → Roles.
- Click Add Role, or click an existing role.
- Enter Role name and Role description.
- On Permissions, check what this job should be able to do. Search the list if it is long.
- Click Create Role or Save Permissions. On an existing role, Save Role Details saves only the name and description.
The Accounts tab on a role lists everyone who currently has it. Click through to their account.
You cannot Delete Role while anyone still has it. Reassign those people first (including to No role if they should lose admin access).
How Permissions Work
Each checkbox is one action in a category (Sections, Billing, Organization Setup, and so on). Categories for add-on features (leads, costumes, events, and the like) only appear if that feature is on for your studio.
A few patterns matter more than memorizing every box:
View vs edit vs the extra verbs. Seeing a list is separate from changing it. Sections also split Enroll students, Drop students, and Take attendance, so a teacher can mark presence without moving kids between classes.
View all vs view own. View own / Edit own (classes, sections, instructors, appointments) limits the person to records they are assigned to as an instructor. That only works if their account is linked to an instructor and they are on those sections. With no instructor link, “own” is an empty list.
If you also check View all, they see everything. Use own-only when a teacher should not browse other teacher’s rosters.
Implied view. If you grant an action in a category and leave view unchecked, EnrollmentHive still adds view for that category so the screens are reachable.
Organization Setup is three different jobs:
| Permission | Usefulness |
|---|---|
| Manage studio settings | Branding, portal, locations, tags, waivers, imports — not staff logins |
| Manage staff and roles | This chapter: accounts, roles, permissions |
| Manage billing setup | Tuition rules, Stripe, coupons, billing integrations |
Give Manage staff and roles only to people you trust to create logins.
Notes sit at the bottom of the permissions form (not in the same category list):
| Option | Usefulness |
|---|---|
| View selected note categories | Front desk can see “Billing” notes but not “Safeguarding” |
| View all note categories | Managers who should see every note |
| Per category View all notes vs View only notes they created | Teachers can keep private lesson notes without reading each other’s |
Note categories come from Setup → Tags. If none exist, there is nothing to pick.
Suggested Setups
| Studio job | Role idea |
|---|---|
| Front desk | Households (view/create/edit/invite), students, enroll, collect payments. Skip organization setup. |
| Teacher | Instructor as shipped, or tighten Sections to view own + take attendance so they only see their classes. |
| Costume parent volunteer | Costumes view/edit, maybe students view. No billing adjust, no staff management. |
| Bookkeeper | Billing view/collect/adjust and reports. No enroll/drop unless they also run the desk. |
When a permission does not match how you work, change the role — not each person. People keep the same role name; you update the checkboxes once.
Related
- Accounts — assigning a role to a login
- Linking Instructors and Households — required for “own” class access
Linking Instructors and Households
An account is only a login until you attach it to the rest of the studio. Two links matter:
- Instructor — this login is a teacher (or assistant) in your staff directory
- Household — this login belongs to a family: they can register, pay, and see their students
You can set one, both, or neither. Neither is a leftover placeholder. Both is the usual “our teacher also has kids here” case.
Why Link an Instructor
The Instructors list is the teaching roster you put on sections (who is in the room). The account is how that person signs in.
Linking them is useful because:
- They can open the admin portal (once they also have a role) and take attendance, see schedules, and use anything that role allows.
- View own / Edit own permissions use this link. EnrollmentHive looks at the instructor on the account, then at the sections that instructor is assigned to. No link means “own” matches nothing.
- Appointments, time tracking, and “this is my class” views follow the same instructor record.
- Families still see the instructor name on the class even if that teacher never logs in. The profile can exist without an account; the account is only for signing in.
An instructor can have more than one login attached. An account can only link to one instructor.
How to link
From Setup (best for staff you already created):
- Open Setup → Accounts.
- On the person, choose Link to instructor (or Edit Role/Links on their account page).
- Pick the instructor, or clear the selector to unlink. Click Link / Save Changes.
From the instructor:
- Open Instructors, then the person.
- Open the Accounts tab and click Add Account.
- Invite by Email creates a new login, emails a claim link, and attaches it to this instructor. First name, last name, email.
- Link Existing Account attaches a login that already exists. This list is parent accounts only (no role yet). To attach someone who already has a staff role, use Setup instead.
Detach account on that table removes the instructor link. It does not delete the login.
Inviting from the instructor does not assign a role. They will show under All Accounts until you give them Instructor (or another role). Without a role they cannot use the admin portal. Link, then assign the role — or create them from Organization Accounts with a role and link second.
Why Link a Household
A household is the family: students, address, ledger, waivers. Accounts on that household are the adults (or older students) who log in and who can be billed.
Linking is useful because:
- The parent portal shows their students and their balance, not the whole studio.
- Each linked account can have its own cards, auto-pay, and balance. Two parents do not have to share a password or a bank account.
- The household primary account is the default responsible account when staff enroll a student from admin.
- Staff who also have children: one login, a staff role, and a household link. They teach in admin and pay in the parent portal without a second email.
An account can only belong to one household. Add a second adult by inviting or linking another account — do not reuse the first login.
How to link
From Setup:
- Setup → Accounts → Link to household (or Edit Role/Links).
- Pick the household, or clear it to unlink.
From the household:
- Open Households, then the family.
- Open the Accounts tab and click Add Account.
- Enter first name, last name, and email, then Send invitation. That creates a new household login and emails a claim link.
There is no “link existing” on the household itself. To attach a login that already exists (a teacher, an imported parent), use Setup → Accounts.
Clicking an account on the household table opens the same account page as Setup.
Putting It Together
| Person | Role | Instructor link | Household link |
|---|---|---|---|
| Studio owner | Optional (already has full access) | If they teach | If their kids enroll |
| Desk manager | Admin or a custom front-desk role | Only if they also teach | If they have students |
| Teacher, no kids at the studio | Instructor (or tighter custom role) | Yes | No |
| Parent only | None | No | Yes |
| Teacher whose child takes class | Instructor | Yes | Yes |
If something feels missing in admin — empty class list, no attendance sheet — check the role and the instructor link and whether they are assigned on the section.
Related
- Accounts — creating logins, invites, and the Organization vs All lists
- Roles — admin portal access and view-own behavior
- Charges and Balances — billing on the household’s accounts
- Taking Attendance — what linked instructors do in class
Tags
Tags are reusable labels you put on classes, sections, students, households, and a few other records. They are how EnrollmentHive groups things that are alike without baking the year or the teacher into the name.
That is useful because the same tag can drive several jobs at once:
- Parents filter the registration page (“just Ballet,” “just camps”)
- Staff filter lists, bulk-edit, and email by tag
- Sections and packages can require a student tag before someone may register
- Attendance can show an icon for allergy or “needs pickup note”
- Tag rules can stamp “Active” or “Balance Due” automatically
Tags are not grades, and not class names. Use the grade fields for a student’s grade, and tags for kind of offering or kind of person.
Configure them under Setup → Tags & Categories. You need Manage studio settings (see Roles).
Groups and Tags
A tag group is the category (Style, Level, Program). A tag is a value in that group (Ballet, Hip Hop, Competition).
New studios start with a Style group that applies to classes and sections and is already a registration filter. Add groups for the other axes you actually search on.
A group can apply to more than one kind of record. Can be applied to options include classes, sections, seasons, students, households, instructors, products, costumes, communications, and leads (if you use leads).
Only offer a group on the records that should have it. Style on classes and sections. Allergies on students. Do not put Style on households.
Best Practices
Make tags reusable year over year
Name groups and tags as if you will still use them in five years.
| Prefer | Avoid |
|---|---|
| Style → Ballet, Tap, Hip Hop | Ballet 2026, Fall Tap |
| Program → Recreational, Company, Camp | 2026–27 Company |
| Student → Competition Team, Scholarship | Company 27 |
When a class comes back next season, you copy or create a new section and keep the same tags. Filters, emails, and discounts keep working. Put the year on the section name and the season, not on the tag.
If you need “everyone in this year’s company,” tag the section with Program → Company and with Year → 2026-27, and email By sections with tag. You do not necessarily need a new Company tag each August.
Deleting a group deletes every tag in it. Prefer renaming a tag (the visible name) over deleting and recreating. The internal Tag ID never changes once created — that is what bulk-edit and imports use — so renaming Ballet to Classical Ballet does not break existing records.
Anything parents should filter must be a class/section tag
The public registration page only adds extra dropdowns for tag groups that:
- Apply to Classes and/or Sections, and
- Have Use as filter on registration page turned on for the group
Each tag also has Show as filter on registration page (on by default). Turn that off for a value you need internally but do not want in the parent dropdown.
A registration filter matches if either the section or its class has one of the selected tags. So:
- Put durable style/level tags on the class (1st Grade Ballet is always Ballet). New sections inherit that for parents without you retagging every year.
- Put offering-specific tags on the section when this run is different (this section is a Camp, or Company only this season).
- If parents should be able to filter it, create the group, apply it to classes/sections, turn on the group filter, tag the class or section, and confirm the tag itself is shown in filters.
Grades, days of week, and ages already have their own registration filters. Do not duplicate those as tags.
Website section embeds use the same “shown in filters” flags for tag options.
Keep groups small and purposeful
One idea per group. Style is not also Level. Competition is a Program (or a student tag), not a fifth Style.
Typical studio set:
| Group | Applies to | Registration filter? | Example tags |
|---|---|---|---|
| Style | Classes, sections | Yes | Ballet, Tap, Jazz, Hip Hop, Acro |
| Level | Classes, sections | Yes | Intro, Intermediate, Advanced |
| Program | Classes, sections | Yes | Recreational, Company, Camp, Intensive |
| Student status | Students | No | Competition Team, Scholarship, Trial |
| Medical | Students | No | Allergy, Asthma (attendance icons) |
| Household | Households | No | Staff family, Board, Past due (often via a tag rule) |
Staff will still filter students and households in admin even when the group is not a parent filter.
Use the extra tag flags on purpose
| Flag | When to turn it on |
|---|---|
| Show icon on attendance page | Medical or pickup flags teachers must see on the roster. Pick an Icon or nothing appears. |
| Important tag (always show in lists) | Rare, high-signal tags (allergy, “do not drop in”) that should not hide behind “more tags.” |
Most tags need neither. The roster stays readable.
Configuring Tag Groups
- Open Setup → Tags & Categories. Stay on the Tags tab.
- Click Add Group.
- Fill in the group, then Create Group.
| Field | Details |
|---|---|
| Tag group name | The dropdown label parents see if this is a registration filter (Style, Program). |
| Tag group color | Color for the group in admin. New tags default to this color. |
| Can be applied to | Which records can receive tags from this group. Multi-select. |
| Use as filter on registration page | Adds this group as a parent-facing dropdown. Only useful if the group applies to classes and/or sections. |
Click a group in the left list to edit it. Save Changes writes the group. Delete Group removes the group and all of its tags — confirm first.
Configuring Tags
With a group selected:
- Click Add Tag.
- Set the tag fields, then Create Tag.
- Click an existing tag to edit. Save Changes or Delete Tag.
| Field | Details |
|---|---|
| Tag name | What people see (Ballet, Allergy). Keep it short and stable. |
| Tag color | Defaults from the group; override if you need it to stand out. |
| Icon | Optional. Required in practice for attendance icons. |
| Show as filter on registration page | Include this value in the parent dropdown when the group is a filter. |
| Show icon on attendance page | Roster icon for students with this tag. |
| Important tag (always show in lists) | Always visible in tag lists instead of collapsing. |
After create, Tag ID (for example style-ballet) is shown with Copy. Use that in bulk-edit and uploads. You cannot change it.
Applying Tags to Records
On a class, section, package, student, household, and so on, use the Tags field: pick the group, then the tag. You can apply several tags from several groups.
Section packages use section tags on the package itself, and student tags for who may see or register for the package.
You do not tag from the Tags setup page. Setup only defines the vocabulary.
Tag Rules
Tag Rules (the second tab) automatically add student or household tags from enrollment and billing. Use them for living labels you would otherwise chase by hand: Active, Balance Due, “in a Company class.”
- Click Add Rule.
- Choose Scope: Student or Household.
- Choose Match: All conditions (AND) or Any condition (OR).
- Add conditions, pick the tags to apply, optionally Auto-remove tags when rule no longer matches.
- Save.
| Condition | Student | Household | Meaning |
|---|---|---|---|
| Actively Enrolled | Yes | Yes | Has a current enrollment (household: any student) |
| Enrolled In Season | Yes | Yes | Enrolled in a section in those seasons |
| Enrolled In Section With Tag | Yes | Yes | Enrolled in a section that has those section tags |
| Has student with a tag | — | Yes | At least one student in the household has those student tags |
| Balance Due | — | Yes | The household has a posted balance due |
| Negate (NOT) | Yes | Yes | Opposite of that condition |
Refresh Now runs the rule immediately (it can touch many records). Clear Tags strips this rule’s tags from every student or household in scope. Auto-remove is the usual choice so “Active” falls off when they are no longer enrolled.
Rules apply student and household tags. They do not tag classes or sections. Keep those manual and year-stable.
Note Categories
The third tab, Note Categories, is not a tag group. It names colors for staff notes (and which categories a role may see). Create categories there if you use notes; do not mix them with Style or Program.
Related
- Classes and Sections — where you apply class/section tags
- Section Packages — student-tag visibility and required tags
- Sending and Scheduling Emails — recipients by section, student, or household tag
- Taking Attendance — roster icons from student tags
- Roles — who can change tag setup
Classes and Sections
EnrollmentHive structures its classes as two separate parts called classes and sections.
A class has a generic description and age requirement given to a something that is taught multiple times. For example, “1st Grade Ballet” or “9-10 year old Tap”. These alone do not tell you when or where the class is, but they will stay the same year after year of teaching them at your studio.
A section belongs to a class and has the remaining information such as when it is taught, by whom, and how much it costs.
We think of this distinction like college classes. You might have taken “Psychology 101” (a class), but when you took it, or with whom, depends on which section you took.
By separating classes and sections in this way you can keep your offerings consistent year over year, and give yourself better reporting down the road, as EnrollmentHive can easily compare two sections that are the same class.
Learn more about:
Classes
A class is a reusable description that groups related sections over time. Students do not enroll in a class directly—they enroll in a section. Creating a class first gives you a stable place to attach sections season after season, which keeps year-over-year reporting and comparisons consistent.
Class Details
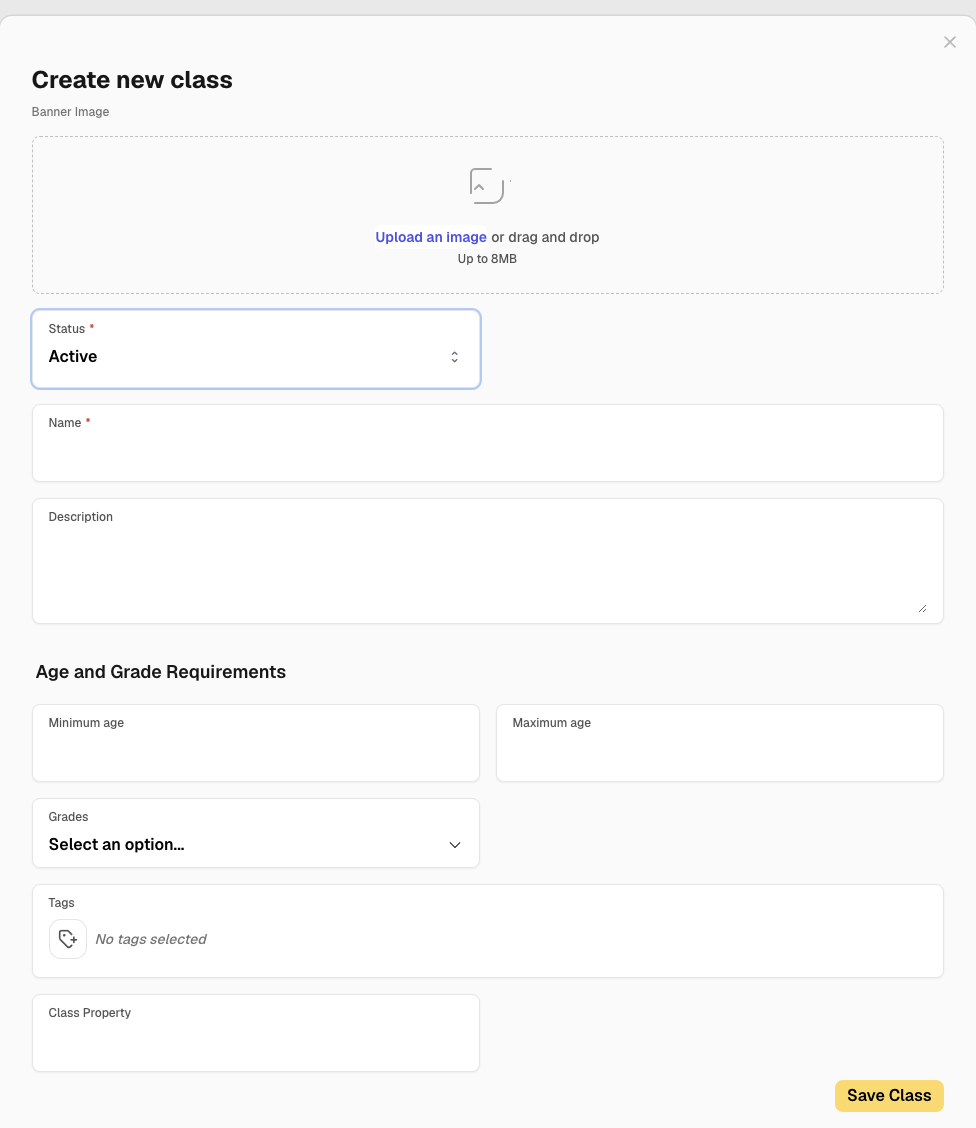
| Field | Required | Details |
|---|---|---|
| Banner Image | No | Upload or drag and drop an image for the class. Maximum size: 8MB. |
| Status | Yes | Defaults to Active. • Active — available when creating sections • Archived — hidden from day-to-day use, kept for history |
| Name | Yes | Use a clear, durable name (for example, 1st Grade Ballet or Advanced Jazz). Use names that still make sense next year. |
| Description | No | Short description of the class displayed on the registration page. |
| Minimum age | No | Youngest age the class is intended for. Leave blank if there is no minimum. |
| Maximum age | No | Oldest age the class is intended for. Leave blank if there is no maximum. If both ages are blank, the class list shows All ages. |
| Grades | No | Multi-select list of grade levels the class covers. Typical options: Pre-School, Kindergarten, 1st–12th Grade, and Adult. Select every grade that applies (for example, both 1st and 2nd Grade for a combined level). |
| Tags | No | Organize classes for filtering and display (for example, Ballet or Hip Hop). 1. Select a tag category 2. Choose tags within that category Categories are configured under organization setup. |
| Custom fields | Varies | Organization-specific fields. Fill these in as needed for your studio. |
Create a New Class
- From the “Classes” tab, click the green + New Class button in the upper right. That opens the Create new class dialog.
-
Provide as much information as you can about your class. This will help parents filter and find your classes on the registration page.
-
Click Save Class at the bottom of the dialog. The new class appears on the Classes page and can be opened to add sections. To discard without saving, close the dialog with the X (or press Escape).
Edit a Class
- From the “Classes” tab, click on the class you want to edit.
- Click the blue “Edit” button in the top right corner.
- Edit the fields you would like to change. You can reference the options in the table above.
- Click “Save Class” when you are done, or press “Cancel” in the top right corner.
Sections
A section is the concrete offering families register for—an instance of a class with its own schedule, capacity, registration window, and pricing. In your day-to-day language, you will likely refer to sections in EnrollmentHive as “classes”, and that is perfectly fine. See Classes vs Sections for a deeper explanation of our choice to call them sections.
Create New or Edit a Section
From the Sections page, click the green + New Section button. You can also start a new section from a class detail page with New Section there.
Either path opens the full New Section page. The form is organized into four blocks:
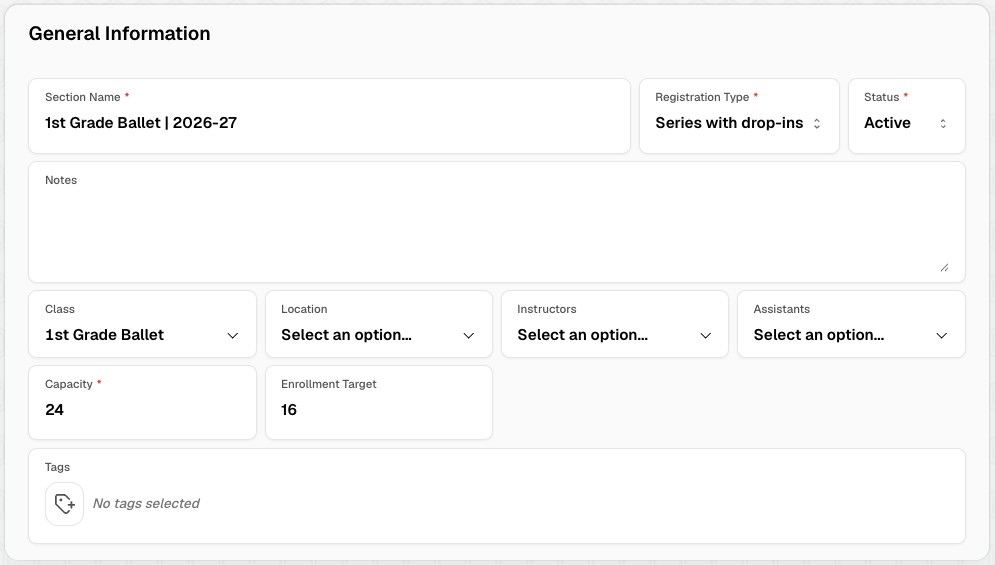
General Information
To start, you will enter basic information about your section.
| Field | Required | Details |
|---|---|---|
| Section Name | Yes | Display name for this section (for example, 1st Grade Ballet | 2026-27 or Ballet Camp (June 2-5)). |
| Registration Type | Yes | Controls how students enroll in the section. Series — enroll for the full run of sessions Drop-in only — pay per session; no full-series enrollment Series with drop-ins — series enrollment plus optional per-session drop-ins |
| Status | Yes | Defaults to Active. Draft — not ready for public use Active — available according to registration settings Archived — retained for history |
| Notes | No | External notes displayed on registration page for this section. |
| Class | Yes | The class this section belongs to. |
| Location | No | Where the section meets. |
| Instructors | No | Primary instructors assigned to the section. |
| Assistants | No | Assistant instructors. |
| Capacity | Yes | Maximum number of students allowed to enroll. |
| Enrollment Target | No | Goal for how many students you want enrolled. Appears as a marker on the enrollment progress bar so you can see when you hit the goal (separate from hard capacity). |
| Tags | No | Organize and filter sections. Select a tag category, then choose tags. |
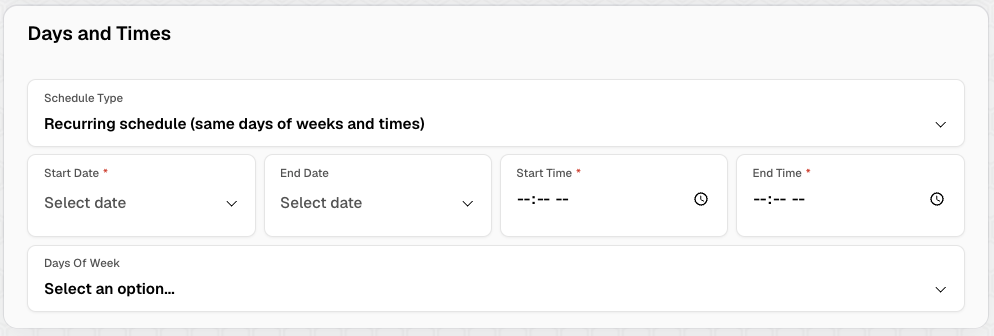
Days and Times
Next, configure how you will schedule this section.
Schedule Type
| Option | When to use | What you set on this form |
|---|---|---|
| Recurring schedule (same days of week and times) | Weekly classes that repeat on fixed days/times | Start/end dates, start/end times, and days of week. Sessions are generated from that pattern. |
| Specific days and times | Camps, intensives, or irregular calendars | You do not enter the full calendar here. After saving, add individual days on the section’s Schedule tab. Optionally enter a Schedule Summary for Registration Page (for example, Mondays 2-3pm, Fridays 4-5pm) so families see a readable summary while registering. |
Recurring schedule fields
| Field | Required | Details |
|---|---|---|
| Start Date | Yes | First day of the section. |
| End Date | No | Last day of the section. |
| Start Time | Yes | Session start time. |
| End Time | Yes | Session end time. |
| Days Of Week | No | Days the section meets (for example, Mon and Wed). |
Specific days and times fields
| Field | Required | Details |
|---|---|---|
| Schedule Summary for Registration Page | No | Summary shown on the public registration page. For example, Mondays 2-3pm, Fridays 4-5pm. |
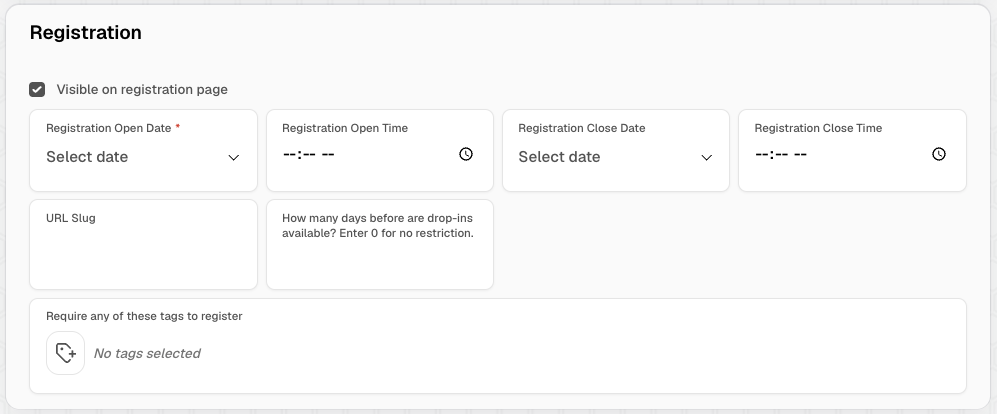
Registration
Controls when and how families can sign up.
| Field | Required | Details |
|---|---|---|
| Visible on registration page | No | When enabled, the section can appear on the public registration page (subject to open/close dates). |
| Registration Open Date | Yes | First day families can register. |
| Registration Open Time | No | Time of day registration opens on the open date. Defaults to midnight. |
| Registration Close Date | No | Last day families can register. Leave blank if registration stays open. |
| Registration Close Time | No | Time of day registration closes on the close date. Defaults to midnight. |
| URL Slug | No | Optional slug for a nicer registration link. For example, enter ballet-2026 for http://yourstudio.enrollmenthive.app/register/section/ballet-2026. |
| How many days before are drop-ins available? | No | Shown for Drop-in only and Series with drop-ins. Limits how far ahead drop-in spots can be purchased. Enter 0 for no restriction. |
| Require any of these tags to register | No | Require students to have at least one of the selected tags to register. |
Billing
Billing configuration options change based on Registration Type and, for series sections, the selected payment plan.
For a deeper walkthrough of pricing choices, see Pricing a Section.
Series Billing
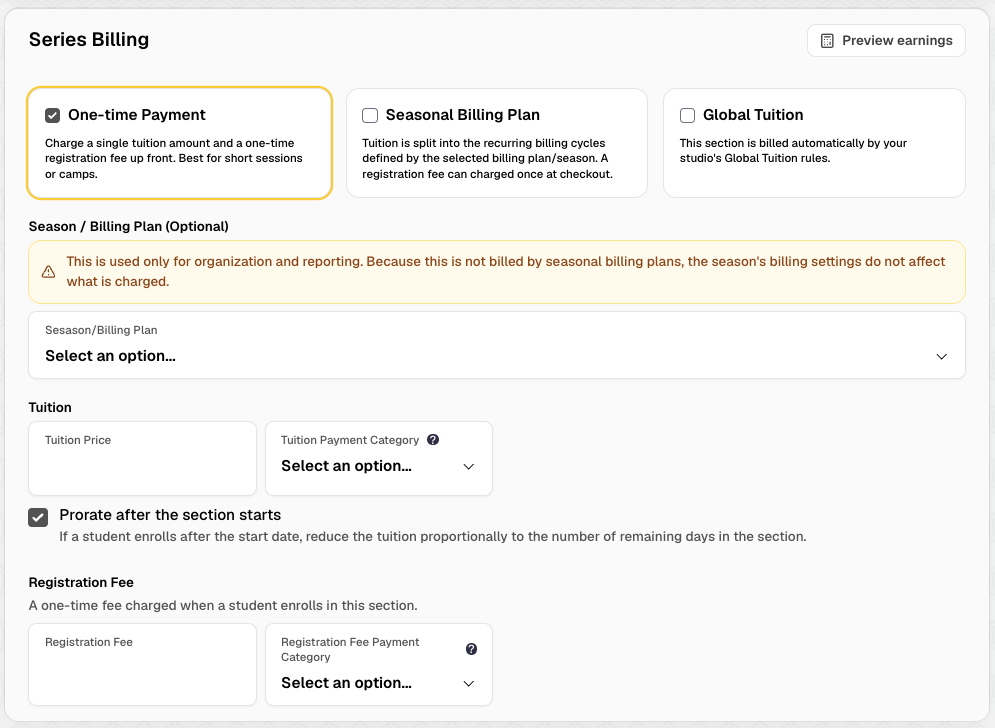
Choose one payment plan:
| Payment plan | Best for | How charging works |
|---|---|---|
| One-time Payment | Camps and short runs | Single tuition amount (plus optional registration fee) charged up front. |
| Seasonal Billing Plan | Full seasons with installment plans | Tuition is split across the billing cycles on the selected season/billing plan. Registration fee can be charged once at checkout. |
| Global Tuition | Studios using studio-wide tuition rules | Section is billed by your organization’s Global Tuition rules. Tuition Price still applies when Global Tuition is configured to use individual section pricing. |
Fields that change with the payment plan:
| Field | One-time | Seasonal | Global |
|---|---|---|---|
| Season / Billing Plan | Optional — for organization and reporting only | Used to generate tuition from the season’s billing periods | Optional — for organization and reporting only |
| Tuition Price | Amount charged for the section | Used with the billing plan | Used when Global Tuition is set to individual section pricing |
| Tuition Payment Category | Optional, but recommended | Optional, but recommended | Optional, but recommended |
| Prorate after the section starts | Available — reduces tuition for late enrollments based on remaining days | Not shown | Not shown |
| Collect first payment at checkout | Not shown | Optional — charge the first billing-cycle payment immediately at registration instead of waiting for the plan’s normal post date | Not shown |
Use Preview earnings to estimate revenue from the current billing setup before you save.
Drop-in Billing

Shown for Drop-in only and Series with drop-ins.
| Field | Required | Details |
|---|---|---|
| Drop-in Price | Yes | Price charged for a single drop-in session. |
| Payment category | No | Payment category for drop-in charges. |
Save
Click Save Section at the bottom of the form (or Save in the header).
If required fields are missing (for example, Class or Capacity), the form highlights them and does not save.
After you create the section, open the section to review enrollments, edit details, and manage the Schedule tab (especially if you chose Specific days and times). You can adjust pricing later if needed — see Pricing a Section.
Structuring Your Sections
Here are a few scenarios you might find in your studio and how we recommend structuring your classes and sections for them.
You offer “1st Grade Ballet” at two different times during the week. Students enroll in one or the other, and their roster is tracked separately.
We would recommend creating a “1st Grade Ballet” class, and then creating two sections, one for each day, and adding the day of week to the name for it to be clearer to you and your parents. For example, “Monday 1st Grade Ballet | 2026-27” and “Thursday 1st Grade Ballet | 2026-27”.
You offer ballet intensives taught by guest instructors throughout the year.
You could have only one class for all Ballet Intensives. However, remember to keep the description generic enough for all sections. You can always add specifics in the notes area of each section. So your class would be “Ballet Intensive”, and your sections could be “Rachel Hansen Ballet Intensive” and “Brendan Hansen Ballet Intensive”.
You could create separate classes for ballet intensives if they have different descriptions or qualifications, such as different age or grade requirements. For example, you might have a “Junior Ballet Intensive” as well as a “Advanced Ballet Intensive”. Then, you can create sections of each of them so users can easily filter down to based on ages and/or grades for their students.
You can also always add a new session to a section if you want to keep enrollment separate for each time/day but still organize it under one section. This is great if you are keeping all details the same, other than time/day.
You only offer on section of “11th Grade Tap” but it is the same every year.
You would have a class called “11th Grade Tap”, and each year you would create a section for it, including the year in the name so it is clear to everyone which year that section is for, For example, “11th Grade Tap | 2026-27”.
Section Packages
A section package is a bundle of sections that a student enrolls in together. Typical uses are a competition track (technique plus two team classes), a camp week with a required core class and a choice of electives, or any offering you sell as one registration instead of several.
The student still ends up on each section roster as a recurring enrollment. The package is the wrapper: it decides which sections they must take, which ones they choose from, and (when you use a package price) how they are billed.
Packages are not punchcards or subscriptions. Those are for drop-in visits. See Subscriptions and Punchcards.
Where to Find Them
Open Sections, then the Packages tab.
The list can be a grid or a table. Each card shows the package name, tags, registration window, how many required sections it includes, and fill (enrolled / capacity). Capacity on the package is the smallest capacity among the required sections. Choice-group sections are not part of that number, but a full choice class can still block enrollment (see When the package is full).
Filter by name, status, tags, season, or specific packages. Bulk Edit opens a spreadsheet-style editor for several packages at once. New Package starts a blank package.
Click a package to open it. From there you can Edit, Duplicate, enroll students, and work the waitlist.
Create or Edit a Package
New Package (or Edit on an existing one) is a full form with five blocks: General Information, Registration, Pricing, Required Sections, and Choice Groups.
Click Save in the header or Save Package at the bottom.
General Information
| Field | Required | Details |
|---|---|---|
| Name | Yes | What staff and families see (for example, Junior Company Package | 2026-27). |
| Status | Yes | Draft — still being built. Active — can be enrolled (and shown publicly if visible). Archived — kept for history. Staff can only Add Student on Active packages. |
| Description | No | Shown on the public package registration page. |
| Package tags | No | Tags in the sections category. Useful for filtering packages in the admin list, and for discounts when the package is billed at a package price. |
Registration
These controls apply to the package on the parent registration page. Each included section still has its own registration settings if someone registers for that class by itself.
| Field | Required | Details |
|---|---|---|
| Visible on registration | No | When on, an Active package can appear on the public registration page (subject to the open/close window and student-tag rules). |
| Approval Required | No | Families request the package instead of checking out immediately. You approve before they are enrolled and charged. Same idea as approval on a section. |
| Open date | Yes | First day families can register. |
| Open time | No | Time on the open date. Defaults to midnight if blank. |
| Close date | No | Last day families can register. Leave blank to stay open. |
| Close time | No | Time on the close date. |
| URL Slug | No | Optional slug for a nicer link, for example junior-company → https://yourstudio.enrollmenthive.app/register/package/junior-company. Letters, numbers, and dashes only. Must be unique in your studio. |
On the package detail page, Copy registration link copies that URL even if the package is hidden from the main registration list. You can share the link directly.
Advanced Options (student tags):
| Field | Details |
|---|---|
| Required student tags | The student must have at least one of these tags to register. |
| Only show to students with tags | Hidden unless the student has one of these tags. |
| Do not show to students with tags | Hidden if the student has one of these tags. |
Pricing
Pick a Pricing Mode, then (for package price) a Payment Plan. This is the same choice documented in Pricing Your Sections; the details live here because you set them on the package, not on each section.
| Mode | Title in the form | What it does |
|---|---|---|
| Package Price | Package Price | One price for the whole bundle. Included sections are not billed on their own for these enrollments. |
| Individual Section Pricing | Individual Section Pricing | Each included section keeps its own one-time, global, or seasonal billing. The package has no price, registration fee, payment plan, or season. |
Package Price fields:
| Field | Required | Details |
|---|---|---|
| Payment Plan | Yes | One-time Payment — charge Package Price (and optional registration fee) up front. Seasonal Billing Plan — split that price across a season’s billing periods. |
| Season / Billing Plan | Yes for seasonal; optional for one-time | For Seasonal Billing Plan, this season’s plans generate the payment schedule. For One-time Payment, a season is optional and is only for organization and reporting — it does not change what is charged. |
| Package Price | Yes | Tuition for the bundle. |
| Tuition Payment Category | Yes | How package tuition is categorized. |
| Registration Fee | No | One-time fee when the student enrolls in the package. |
| Registration Fee Payment Category | No | Category for that fee. |
| Collects first payment at checkout | No | Shown for Seasonal Billing Plan. Posts the first billing-cycle payment immediately at registration instead of waiting for the plan’s post date. |
Use Preview earnings while you are editing. Amounts are shown in full without proration.
- Package Price — one table of collections (tuition periods plus registration fee). If the season has more than one billing plan offered at checkout, pick the plan in the preview.
- Individual Section Pricing — a table per included section, using that section’s own billing settings.
Changing a section’s tuition later only affects Individual Section Pricing packages. Package Price enrollments keep following the package, not the section.
Required Sections
Every student in the package is enrolled in these sections. Click Add Sections, search or filter, check the ones you want, then Add selected. Remove a section with the X on its card.
A section can belong to more than one package, but it cannot appear twice in the same package (not in required and a choice group, and not in two choice groups).
Choice Groups
Optional. Use these when families pick from a list (one technique class out of three, two electives out of five, and so on).
- Click Add Group.
- Enter a Group name (for example,
Technique class). - Set Choose at least and Choose at most. If they must pick exactly one, set both to
1. The maximum cannot be larger than the number of sections in the group. - Add Sections into that group.
On registration and when you enroll from the studio, the family or staff member must pick a valid number from each group before they can continue. Full sections in a group are disabled; if a group no longer has enough open seats to meet Choose at least, the package waitlists instead of enrolling.
You can build a package with only required sections, only choice groups, or both. The package must include at least one section before anyone can enroll.
How Billing Works After They Enroll
Package Price posts ledger items against the package (descriptions like Tuition for Junior Company Package). Recurring tuition, seasonal posting, and global tuition skip those section enrollments so you do not double-charge.
Individual Section Pricing posts against each section the same way a normal enrollment would, including that section’s registration fee if you charge checkout items.
Staff enrollment uses the same billing step as enrolling in a single section: Charge items due at checkout, Charge future tuition, optional fee/price overrides, household, responsible account, and billing plan. Charges Posting Now lists the lines; click X to leave one off.
The responsible account on the package is who is billed for package-level tuition. Each section enrollment in the bundle uses that same account when they are enrolled through the package.
If the student is already enrolled in a section that the package includes, that existing enrollment is moved into the package instead of creating a duplicate. You will see a warning naming those sections before you confirm.
You can also attach a standalone section enrollment to a package later from Manage Enrollment on the section. See Managing Enrollments.
A student can only be in a given package once.
Enrolling from the Studio
- Open the package (it must be Active).
- In Enrolled Students, click Add Student.
- Pick the student.
- If the package has choice groups, select sections that satisfy each group’s min/max, then Continue.
- Review billing and click Enroll student.
If the package cannot take another student (see below), the same flow waitlists them instead. The confirm button will say Waitlist student, and no charges post.
Families enroll from the public page: Add Package to Cart, Join Package Waitlist, or Request Package Registration, depending on capacity and Approval Required.
There is no “add package” on the student Enrollments tab. Enroll from the package, or enroll in a section and attach the package afterward.
When the Package Is Full
EnrollmentHive will not over-enroll a section, including through a package.
The package is treated as waitlist-only when:
- Any required section is at capacity, or
- A choice group does not have enough open sections left to meet Choose at least.
Waitlisted rows show the student’s saved Choices. Use the menu to Enroll student (promotes them with those saved selections) or Remove from waitlist.
Seats are tracked on the sections, not as a separate package-only cap. Someone who enrolls in a required class by itself uses a seat the package also needs.
Managing a Package Enrollment
On the package roster or the student’s Enrollments tab, the package appears as its own Package row (in addition to the section rows). The menu offers:
| Action | Details |
|---|---|
| Manage Enrollment | Billing plan (from the package’s season), grade snapshot, and Price override for package-priced tuition. Leave override blank to use the package default. Changing the billing plan may mean correcting ledger items that already posted. |
| Edit Responsible Account | Who is billed for future package charges. Upcoming items move; posted items stay put. |
| Drop student | Unenrolls them from every section in this package and removes the package enrollment. |
Dropping someone from a single section does not drop them from the package. You will see a warning if you try. To take them out of the whole bundle, drop them from the package.
Posted charges stay on the account. Review the household ledger if you need to remove upcoming tuition or reverse something already billed.
Duplicate
On the package, open the overflow menu and choose Duplicate. Name the copy and confirm.
The copy is created as a Draft, not visible on registration. Settings, pricing, tags, and empty choice groups are copied. Required sections and the sections inside choice groups are not copied — add those on the new package so you do not accidentally reuse last year’s classes.
Related
- Pricing Your Sections — package price vs individual section pricing, and how that interacts with one-time, global, and seasonal billing
- Sections — creating the classes that go in the bundle
- Managing Enrollments — attaching a section to a package, dropping a section without dropping the package
- Charges and Balances — ledger, responsible accounts, and reversing posted charges
Pricing Your Sections
There are a variety of ways to price your sections in EnrollmentHive to suite your business needs. You select how you want to price your sections on a section-by-section basis. This guide will walk you through the different ways and when you would want to use them.
One-time Payment
The simplest way to charge for your sections is through a one-time payment. This payment is due when the student enrolls in the class and is either paid at checkout or is placed on the responsible account’s balance when enrolled from the admin portal.
This pricing mode is best for camps or short duration classes where charging multiple times does not make sense.
To charge a one-time payment, set the Series Billing mode to “One-time Payment” when editing or creating a section. Then enter the total amount you want to collect in the “Tuition Price” field. You can optionally select “Prorate after the section starts” to automatically lower the price if someone signs up part way into the section. In addition to the tuition, you can also collect a “Registration Fee”. This may be useful if you have a policy of non-refundable registration fees, but you do refund tuition.
Global Tuition
To charge a recurring tuition amount every month, the easiest way is to use the Global Tuition pricing mode.
You will need to configure your global tuition settings in your Organization Setup under “Tuition”.
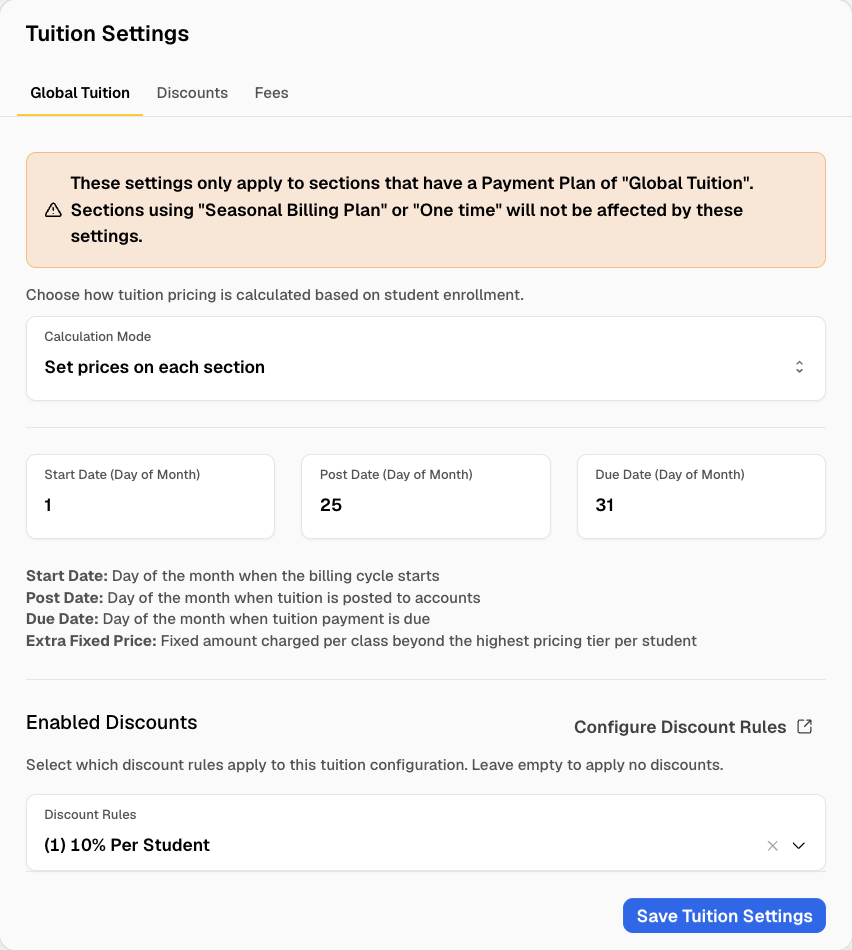
The most important setting here is the “Calculation Mode”. It tells the system how to calculate tuition for the sections using Global Tuition. There are three options:
| Mode | Description |
|---|---|
| Set prices on each section | System totals the “Tuition Price” of every section the account is responsible for. |
| By Number of Classes Per Week | System calculates the total tuition cost for an account by totaling the number of times all the enrollments it is responsible for meet in a week. Allows you to specify the pricing curve for how much a given number of classes is per month. Does not use the “Tuition Price” of the section. |
| By Number of Hours Per Week | System calculates the total tuition cost for an account by totaling the amount of time all the enrollments it is responsible for meet in a week. Allows you to specify the pricing curve for how much a given amount of time is per month. Does not use the “Tuition Price” of the section. |
In addition to setting up the calculation mode, you also set up when your billing cycles are. You set the start day of the billing cycle, the day the tuition posts, and the day the tuition is due.
For example, a start day of 1, a post day of 21, and a due day of 5 would mean: “Tuition runs from the 1st of one month, to the 1st of the next. Tuition is posted the 21st before the tuition start date, and is due the 5th of the month after it is posted”. For example, September tuition would run from September 1st to October 1st, would post on August 21st, and be due September 5th.
Global tuition only support monthly billing periods; if you need a more flexible solution, use Seasonal Billing Plans.
Finally, you can enable certain discounts to apply to global tuition, if your tuition is calculated by “Set prices on each section”. You cannot use discounts with the other calculation modes currently; we recommend building the discount into your pricing curve.
Seasonal Billing Plans
Seasonal billing plans are much like Global Tuition, but they give you more control over billing periods and allow you to offer multiple way to pay for a section.
To use seasonal billing plans, you will first have to create a “Season”. Go to the “Seasons” tab, then “+ New Sesaon”.
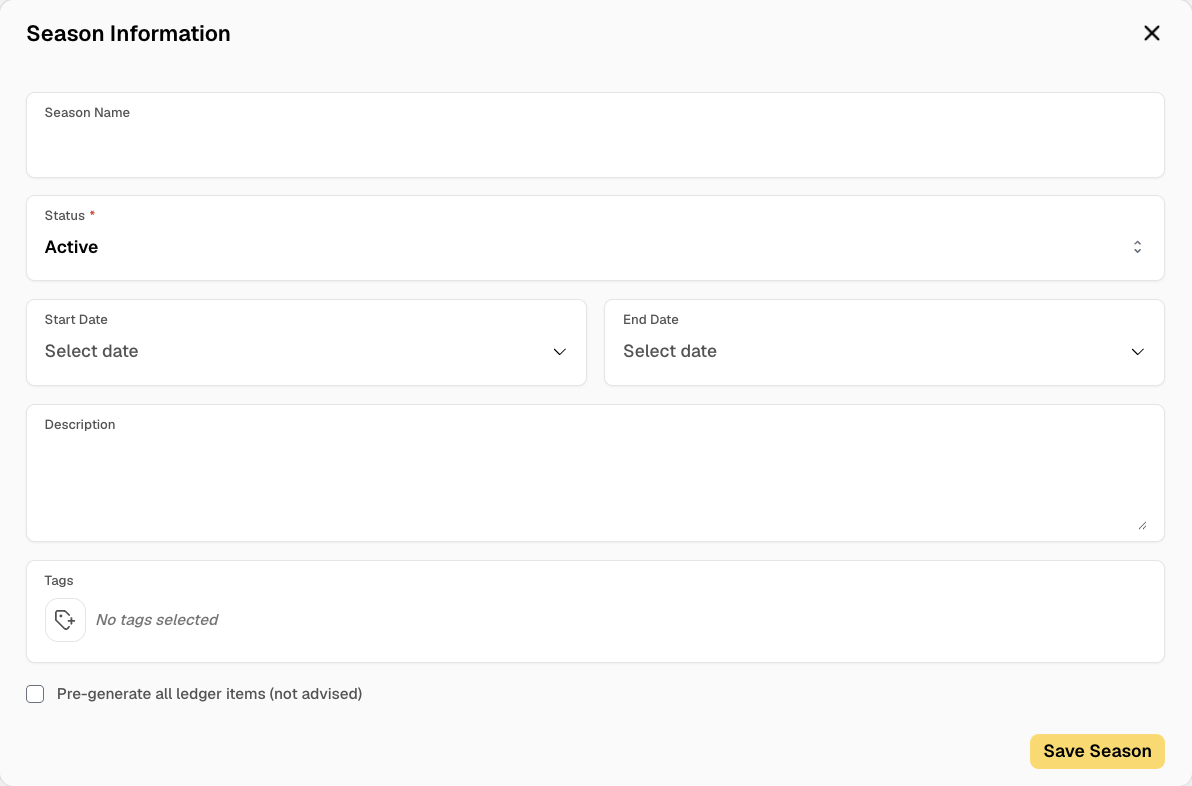
The only required field is the Season Name. All other fields are for your reference (when the season is and what kinds of sections it contains).
From within your new season, click the “+ Add Plan” button on the Billing Plans area.
Give your billing plan a short descriptive name, like “Monthly” or “One-time”. You can also choose if you want this plan to be offered at checkout to customers. This allows you to offer your customers a way to choose how they want to be billed for their classes, whether it be monthly, one-time, or even 3 equal payments throughout the year.
Just like the Global Tuition, you can configure how you want this billing plan to calculate the total tuition. See the section above for more details.
Finally, you configure your billing periods. You can either type these manually, or use the Generate Periods button to quick generate a full year’s worth of monthly tuition from which you can adjust.
Because you are directly creating these billing periods, you have more control than you do with Global Tuition. You can choose to prorate the amount if a student enrolls part way through a period. You can also choose a multiplier that is applied to the tuition to adjust for partial months or collecting multiple months at once.
This is best explained through examples. Here are a couple billing period configurations we have seen some of our studios using.
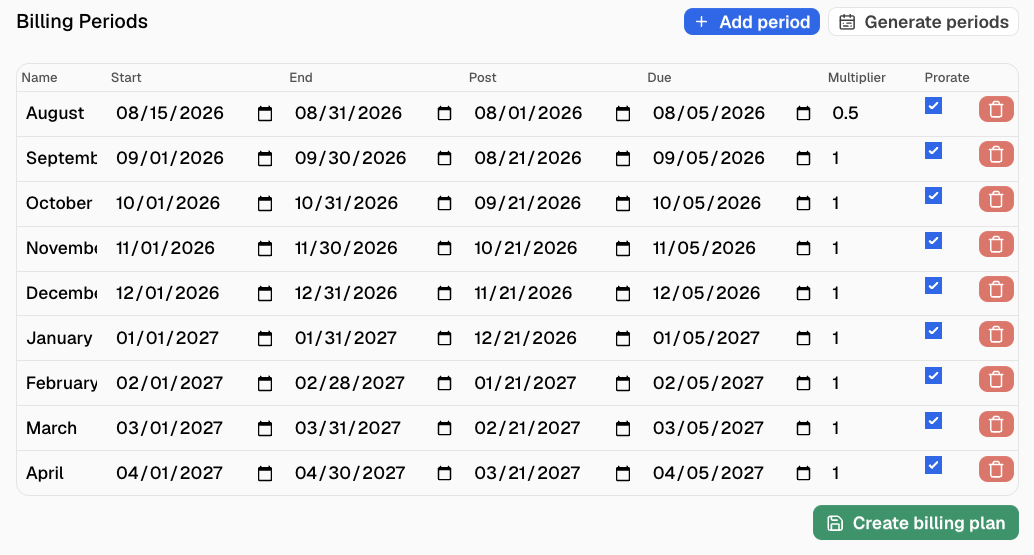
In this example, the students start halfway through August and the studio decided to reduce August’s tuition to compensate for that. They set the multiplier to 0.5 (or 50%) to multiply the calculated tuition by 50% for that period.
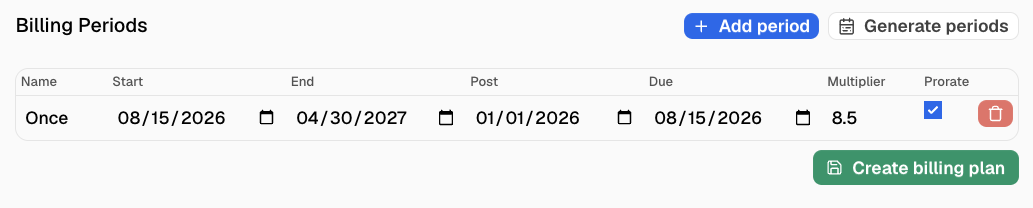
In this example, the studio is charging a one-time payment for the entire section. They have the due date as the first day of classes, but the post date as January 1st. This guarantees that when enrolling the first period will be posted and collected at checkout. They also set the multiplier to 8.5, which is for the 8 and a half months of class the payment is covering.
To use these billing plans, a section must use “Seasonal Billing Plans” for its series billing, and be part of the configured season.
Seasonal Billing Plans give you the most control over tuition pricing, but it is always a good idea to use the “Preview Earnings” button when configuring a section to make sure the total and billing periods are correct.
Section Packages
A section package enrolls a student in several sections at once. Families pick the package on the registration page (or you enroll them from the Packages tab), then they are placed in every required section plus any choice-group sections they selected.
Packages are a different idea from subscriptions and punchcards. Those cover drop-in visits. A package creates recurring enrollments in the bundled sections.
You choose how the bundle is billed with Pricing Mode:
| Mode | What families pay | How tuition is calculated |
|---|---|---|
| Package Price | One price for the whole bundle (plus an optional package registration fee) | The individual sections in the package are not billed on their own. Recurring tuition, global tuition, and seasonal charges on those sections skip enrollments covered by this package. |
| Individual Section Pricing | Whatever each included section already charges | No package-level price or package registration fee. Each section uses its own one-time, global tuition, or seasonal setup. |
When the mode is Package Price, you also pick a Payment Plan:
| Plan | When to use it |
|---|---|
| One-time Payment | Charge the Package Price (and optional registration fee) up front. You can still attach a season for reporting; that season does not change what is charged. |
| Seasonal Billing Plan | Split the package price across the billing periods on a season, the same way a section uses seasonal plans. A registration fee can still be charged once at checkout. Turn on Collects first payment at checkout if the first cycle should post immediately instead of waiting for the plan’s post date. |
Use Preview earnings on the package form to see the collection schedule. For package price, that is the package total. For individual section pricing, you get a schedule per included section.
A student can also be attached to a package after they are already in a section. If the package uses Package Price, attaching them covers that section so extra section tuition is not created.
For creating packages, choice groups, waitlists, and enrolling from the studio, see Section Packages.
Drop-ins
If your section allows for drop-ins (has a registration type of “Drop-in only” or “Series with drop-ins”), then you can charge per session a student attends.
To charge a drop-in fee, go to the Drop-in Billing area in you section, and set the “Drop-in Price” to the amount desired. This payment is due when the student enrolls in the session and is either paid at checkout or is placed on the responsible account’s balance when enrolled from the admin portal.
Subscriptions and Punchcards
“Subscriptions and Punchcards” are available as an add-on feature that is included in the Plus plan and above.
Punchcards allow your customers to buy a pass that gets them:
- A certain number of drop-ins punches
- Unlimited drop-ins for a certain amount of time
- A combination of the two: limited punchces with a time limit.
A punchcard does not use the drop-in price of the section. Instead, it allows for your customer to drop-in to any applicable section and use their punchcard as payment. You can restrict which sections a punchcard applies to when configuring the punchcard.
Subscriptions are much like punchcards, but they are renewed automatically while the customer has an active subscription. You can similarly restrict which sections are applicable to a subscription when configuring it.
Subscriptions allow you to offer “memberships”, where the customer can drop-in to unlimited classes a month and simply pay a month fee. Great for workout or technique classes.
You can configure Subscriptions and Punchcards in the “Passes” tab, or by searching for “Passes”.
Responsible Accounts
Every enrollment has a responsible-account, which is the account that is responsible for paying for the enrollment, and any other charges incurred for that enrollment (costume charges, late fees, etc).
By default, the responsible account is the account that went through the checkout process and enrolled the student. If the student was enrolled from the admin portal, it will be the primary account on the student’s household.
You can change the responsible account by going to the Enrollments tab on the student, clicking the three dots on the right side, and selecting “Edit Responsible Account”. In the pop-up, you can select the household and the account that is going to be responsible. The system will then move any unposted ledger items to the new account automatically. Any posted items will not be moved automatically and will need to be deleted and re-added to the new account.
The responsible-account system is very flexible and allows for complicated billing situations without any hassle. For example, a student might have a scholarship for a particular section they are in. In this case, you can create a household and account that represent the scholarship, and then change the responsible account of the student’s enrollment to be the scholarship account. The system will automatically bill the scholarship account for just that enrollment.
Day to Day Operations
This chapter covers some of the common things you will do day-to-day in EnrollmentHive.
Managing Enrollments
Most of the time, families enroll themselves from the public registration page. This page is about what you do from the studio side: looking at who is in a class, adding someone by hand, changing billing, moving a student, or dropping them.
Students enroll in a section, not in a class. In day-to-day language you will still call these “classes,” and that is fine.
Where to Look
There are a few places you will spend time with enrollments:
- The Enrolled Students list on a section — the roster for that class
- The Enrollments tab on a student — everything that student is in, plus history
- The Sections tab — fill rates across the studio, so you can see which classes are full or light
- A specific session (from the section Schedule tab, the studio Schedule, or attendance) — drop-ins and trials for that day
Click a student on the section roster to open their profile.
Kinds of Enrollment
| Kind | What it means |
|---|---|
| Recurring | The student is enrolled in the whole section. This is the usual “they are in this class” enrollment. |
| Drop-in | The student is enrolled for a single session and billed as a drop-in. |
| Trial | The student is enrolled for a single session and billed as a trial. |
| Package | The student is in a section as part of a section package. Billing may be handled by the package instead of the individual section. |
The section roster only lists recurring enrollments. Drop-ins and trials live on the session / attendance page for that day, and on the student’s Enrollments tab.
Drop-in only sections do not show an Enrolled Students card at all. Manage those students from each session.
Viewing a Section Roster
Open Sections, then click the section you want.
The Enrolled Students card shows how full the class is (enrolled / capacity) and a progress bar. If you set an Enrollment Target when you created the section, that appears as a marker on the bar so you can see when you hit your goal, separate from hard capacity.
Each row shows the student’s name, age, gender, and grade. Grade on the roster is the grade stored on the enrollment (a snapshot from when they enrolled), not necessarily their current student record.
If the section is a draft or archived, you can still look at the roster, but adding, moving, and dropping are limited to Active sections.
Enrolling a Student
You can enroll from a section, from a student, or from a session. The last step is always billing, so you can see what will post before you confirm.
From a Section
- Open the section.
- Click Add Student in the Enrolled Students card.
- Choose an Existing Student, or use Visiting Student for a guest (see Visiting students).
- Review billing and click Enroll students.
This path enrolls them as recurring in that section.
If the section is already at capacity, this same button waitlists the student instead of enrolling them. The confirm button will say Waitlist students, and no charges will post. See When the class is full.
From a Student
- Open the student.
- On the Enrollments tab, click Add Enrollment.
- Choose the section.
- Choose how they should attend:
- Recurring — ongoing enrollment in the class. If the class is full, this adds them to the waitlist.
- Drop-in — one class, billed as a drop-in. You then pick the day on the calendar (highlighted days are when the class meets).
- Trial — one class, billed as a trial. Same calendar step.
- Review billing and click Enroll students.
Drop-in and Trial are only offered when you are picking a session. Recurring is only offered for series sections (not drop-in only).
From a Session (Drop-in or Trial)
From a session page, click Enroll Students. This is the same idea as walk-in enrollment on the attendance sheet. For that flow, see Taking Attendance.
You can enroll a drop-in even on sections that do not have drop-ins enabled for public registration.
Billing at Enrollment
Before you confirm, you choose what should hit the family’s ledger.
For a recurring (section) enrollment:
| Option | What it does |
|---|---|
| Charge items due at checkout | Posts registration fees and other checkout charges. You can Override registration fee if needed. |
| Charge future tuition | Posts upcoming tuition for the enrollment. You can Override section price if needed. |
| Household / Override household | By default, charges go to the student’s household. Enabling Override household bills a different household. Use this carefully. |
| Selected account | The responsible account that receives the charges. |
| Selected plan | The billing plan for this enrollment, when the section is attached to a season. |
| Attach to section package | Shown if the student already has a package enrollment. Attaching them can cover this section so no extra charges are created. |
| Request Waiver | Shown if the household is missing a required waiver. Check this to send a waiver request after they enroll. |
For a drop-in or trial (session) enrollment:
| Option | What it does |
|---|---|
| Charge for this session | Posts the drop-in / trial charge. |
| Override price for this session | Leave blank to use the section’s drop-in price. |
| Punchcard | If the student has an applicable punchcard, you can apply it instead of (or against) the session price. |
Charges Posting Now lists every ledger item that will be added. Click the X on a line to leave that charge off. If the enrollment is covered by a package billed at a package price, you will see that no additional charges will be created.
When you are ready, click Enroll students.
Posted charges are not automatically refunded later if you drop the student. Only upcoming (not yet posted) ledger items are removed on drop. If you need to reverse something already posted, do that on the household ledger.
Visiting Students
On Visiting Student, pick a household, then enter first name, last name, and gender. Click Next.
That creates a visitor student on the chosen household and bills the selected account on that household — the same pattern as a walk-in on attendance.
When the Class Is Full
EnrollmentHive will not over-enroll a section. If enrolled is already at capacity:
- Adding a student from the section waitlists them and does not post charges.
- Choosing Recurring from the student enroll flow does the same.
- Moving a student into a full section fails. Increase capacity on the destination section first, then try again.
You can still enroll drop-ins and trials on a session when the section is full, up to that session’s drop-in capacity.
To enroll someone who is already on the waitlist once a spot opens, open the Waitlisted Students card, use the menu on their row, and click Enroll student. That opens the same billing step as a normal enroll, and they are taken off the waitlist when it succeeds.
Managing an Existing Enrollment
On the section roster or the student’s Enrollments tab, open the menu on the right of a row. Depending on your permissions and whether the section is active, you may see:
- Manage Enrollment
- Edit Responsible Account
- Move student to another section
- Add ledger items to household
- Drop student
Manage Enrollment
Opens a flyout where you can change:
| Field | Details |
|---|---|
| Attached section package | Attach or clear a package enrollment. Clear with the X on the selector. |
| Billing plan | Plans from the section’s season. If the section is not on a season, you cannot pick a plan. Changing plans may mean you need to correct ledger items that already posted under the old plan. |
| Start Date / End Date | When this enrollment is considered to run. New recurring enrollments start on the section start date, or today if the section has already started. |
| Grade | Grade stored on this enrollment. |
| Price override | Custom tuition for this enrollment. Leave blank to use the section default. |
If the enrollment is part of a package billed at a fixed package price, Price override is locked. Change the package price instead.
If the student has manual tuition configured, a notice explains that price overrides do not affect tuition during covered manual-tuition cycles.
Click Save Enrollment when you are done.
Edit Responsible Account
Changes who is billed for this enrollment going forward.
Pick the household and the account. Upcoming ledger items for this enrollment move to that account. Charges that have already posted stay where they are; move or reverse those on the ledger if needed.
This is the same responsible account idea used at registration. A common use is billing a scholarship household for one class while the family pays for everything else.
Click Change to save.
Move Student to Another Section
Use this when the student should leave this class and join a different one.
- Choose Move student to another section.
- Pick the New section.
- Click Move student.
The student is enrolled in the new section as recurring, using that section’s default billing plan. Upcoming charges on the old enrollment are removed, and new charges are generated for the new enrollment. The old enrollment is recorded as a transferred enrollment on the student (it does not look like a drop).
You cannot move into a full section. You also cannot move unless you have permission both to enroll and to drop.
Add Ledger Items to Household
Posts charges that were not created (or were removed) when the student enrolled. Choose Items due at checkout, Upcoming items, or both, then review the list. You can remove individual lines, override the household, and pick the account. A warning icon on a line means a similar item may already exist on that account.
Click Submit to add them.
Drop Student
- Choose Drop student.
- Confirm with Drop Student.
This unenrolls them from the section, frees a seat, and deletes upcoming ledger items for that enrollment. Posted charges stay on the account.
A dropped enrollment record is kept on the student so history and reporting still show that they were in the class.
If they were in the section as part of a package, dropping them from the section does not drop them from the package. You will see a warning to that effect before you confirm.
On a session attendance sheet, Drop student applies to that session enrollment (a drop-in or trial). To take a recurring student out of the class entirely, drop them from the section roster or the student’s Enrollments tab.
Looking at a Student’s Enrollments
Open the student and use the Enrollments tab. You can search, and you can filter with All, Recurring, Trial, Drop-in, or Dropped.
Enrollments are split into:
- Current Enrollments — still in progress. A badge of Upcoming means the start date is still in the future; Current means they are in it now.
- Completed Enrollments — the section has ended, the session date has passed, or the student was dropped, transferred, or marked completed.
Each row shows the section (or package) name, kind, season, dates, who enrolled them and when, and the responsible account.
The same row menu as the section roster is available here. For dropped records you instead get:
- Edit enrollment — change Kind (Dropped, Transferred, or Completed), Start date, End date, and Enrolled on. Click Save. This only edits history; it does not put the student back in the class.
- Remove enrollment — deletes the dropped record. You will be asked to confirm. This does not re-enroll the student.
The student’s Waitlist tab lists sections they are waitlisted for.
Related
- Taking Attendance — roster for a single day, walk-in enroll, and marking presence
- Pricing a Section — how tuition, drop-in prices, and responsible accounts work
- Sections — capacity, registration type, and creating the class they are enrolled in
Charges and Balances
Tuition, fees, credits, and payments all live on a household ledger. This page covers what you do day to day: posting charges, recording money that already came in, collecting from a saved card or bank account, and working balances in bulk from Manage Balances.
Families can also pay themselves from the parent portal. The tools here are for when you are doing it from the studio.
Households vs Accounts
This is the piece that trips people up. EnrollmentHive splits “the family” from “who is billed.”
A household is the family record: students, address, and one or more people who can log in. Open Households, then click a household to work on their ledger.
An account is a person in that household who can log in and who can be billed. Payment methods, auto-pay, and a running balance belong to an account, not to the household as a whole and not to a student.
A few consequences of that split:
- Students belong to the household. They are not billed directly. Each charge is attached to an account, and optionally tagged with a student so you can see who it was for.
- One household can have several accounts (two parents, a grandparent, a scholarship contact). Each account can have its own cards, its own auto-pay setting, and its own balance.
- Enrollments have a responsible account. That is the account that receives tuition and other charges for that class. You can bill mom for one class and a scholarship account for another, even when the student lives in the same household.
- When you collect, you collect from one account at a time. There is no single “charge the household” button that hits every parent.
The household Ledger tab has a Viewing billing for selector at the top. Choose All accounts to see everyone together, or pick one account to focus.
Scholarship example: create a household and account that represent the scholarship, then set that account as the responsible account on the student’s enrollment. EnrollmentHive bills the scholarship account for that class only. See Responsible Accounts.
How the Ledger Works
Each row is a ledger item. Most items are either a charge (the family owes you) or a payment (money or credit applied).
| State | What it means |
|---|---|
| Upcoming | Scheduled, not on the balance yet. Typical for future tuition. Dropping an enrollment removes these. |
| Complete | Posted. Charges count toward the balance; payments reduce it. |
| Pending | A card/bank collection is still processing. |
| Failed | A collection attempt failed. The charge is still unpaid. |
The large Balance number only includes posted items (Complete and Pending). Upcoming tuition does not change it until it posts.
Paid on a charge row is how much has been allocated to that charge (including credit). A payment row shows the payment amount in green. Running Balance on the right is the account total after that row.
Payment categories (tuition, registration, costumes, and so on) are how you group charges for reports and for bulk collection. Pick a category whenever you post a manual charge.
Opening a Household Ledger
- Go to Households and open the household.
- Open the Ledger tab.
- Optionally filter to one account with Viewing billing for.
Under the balance you will see whether auto-pay is enabled (for one account) or how many accounts have it on (when viewing all).
Four buttons sit under the balance:
- Add Charge — put something they owe on the ledger
- Add Credit — studio credit (no money moves)
- Log Payment — record cash, check, Zelle, or another offline payment (no card is charged)
- Collect Payment — charge a saved payment method, or send a payment link
The Billing card under those buttons has tabs: Posted Items, Upcoming Items, Payments, Payment Methods, and Manual Tuition.
Adding a Charge
Click Add Charge. Choose the Account that should owe it, and optionally the Student it is for.
Then pick how to build the charge:
| Tab | Use when |
|---|---|
| Product/Service/Fee | You already have a product, service, or fee set up. Select it (and a variant if it is a product). Amount and category fill in from the product. |
| Registration Fee | You want a registration fee you have already configured. |
| Manual | A one-off charge. You enter Amount, Description, Payment Category, and optionally Override tax percentage. |
Every charge also needs:
- Post date — when it hits the ledger. Use today to put it on the balance now, or a future date so it stays under Upcoming Items until then.
- Due date — when you expect it paid. Used by “only include items that are due” in Manage Balances.
- Notes — optional. Families can see description and notes, so write them as if a parent will read them.
Click Add charge.
Tuition from enrollments is usually created automatically when you enroll someone. Use Add Charge for costumes, extra fees, missed registration fees, and anything else that is not generated for you. You can also add enrollment-related items from the student’s enrollment menu with Add ledger items to household — see Managing Enrollments.
Adding a Credit
Click Add Credit. This does not refund a card and does not take money in. It records studio credit on an account (shown as a Credit payment, hidden from the public payments list as a card transaction).
- Choose the Account.
- Enter Amount paid (the credit amount), Description, and Notes.
- Allocate the credit: check unpaid charges and type how much each should get, and/or check Leave unallocated for credit you want sitting on the account.
- Allocated total must match Amount paid exactly. Remaining to allocate should be
$0.00. - Click Add credit.
Unallocated credit lowers what you still need to collect, but it is not fully “applied” to specific charges until you allocate it (here) or reconcile it.
Logging a Payment
Use Log Payment when the family already paid you outside EnrollmentHive — cash at the desk, a check, Zelle, and any other methods you have configured.
Logging a payment does not process a card or bank account. If you want EnrollmentHive to charge a saved method, use Collect Payment instead.
- Choose the Account.
- Enter Amount paid.
- Choose Payment type (Cash, Check, Zelle, or your studio’s extra methods).
- Optionally edit Description and Notes.
- Check the unpaid charges this payment should cover, and enter an Allocated amount on each (up to Max). Use Leave unallocated for overpayment or a prepayment that should sit as credit.
- When Remaining to allocate is
$0.00, click Log payment.
If allocated total does not match the amount paid, the form will not submit.
Collecting from a Payment Method
Click Collect Payment. The dialog has two tabs: Collect Payment and Send Payment Link.
Charge a saved method
- Choose the Account. They must already have a payment method. If they do not, you will be asked to add one first (see Payment methods).
- Check the unpaid items to collect, and adjust Charge Now if you are only collecting part of a charge.
- Select a Payment Method. The default method is selected when there is one.
- Confirm the Charging total. If your studio adds a card surcharge, it is shown here.
- Click Charge. The method is charged immediately. A confirmation email is sent when the charge succeeds or is processing.
Send a payment link
Use Send Payment Link when someone should pay online without logging in (a relative, a one-off payer, or a family that prefers a link).
- Choose the Account and the unpaid items to include.
- Set Link expires after (days) (default is 14).
- Click Generate payment link, then copy the URL.
The guest must pay the full amount in one card payment. They cannot split it or pay by bank transfer on that link.
Managing Ledger Items
On Posted Items or Upcoming Items, open the menu on a row.
Edit ledger item
Change description, notes, account, student, amounts, category, post date, and due date.
If the item already has payments allocated to it, many of those fields lock. You will see a note that it cannot be fully edited.
Parents can see this information, so keep descriptions readable.
On an upcoming item, Post Now (next to Post date) posts it today. That cannot be undone from this button — it moves the item onto the balance.
On a payment row, you can open Reallocate to point that payment at different posted charges. The amounts you allocate must add up to the full payment.
The edit view also shows what the item paid for, what paid for it, and related items.
Split item
Available on unpaid (or not fully paid) charges. Use this to break one charge into several with their own post and due dates — for example, a costume billed in two installments.
The first row keeps the leftover. Click Add row, enter each piece’s Charge (no tax) and dates, then Split item. The pieces must add up to the original charge (tax is split with them).
Duplicate charge
Creates a new charge with the same account, student, amount, and description. Post date and due date are set to today.
Remove ledger item
Deletes the row. You cannot remove an item that has already been paid, or a payment that was collected through Stripe (card/bank). Upcoming tuition is safe to remove if you need to; dropping an enrollment also removes its upcoming items.
View charge / View refund
Opens the processed payment (or refund) in Payments.
Payment Methods and Auto-Pay
On the household Payment Methods tab:
- Click Add Payment Method, pick the Account, enter card or bank details, optionally a nickname, then Add payment method.
- Set as default marks which method Collect Payment and auto-collection should prefer.
- Delete removes it. That cannot be undone.
Methods belong to an account. Mom’s card will not charge Dad’s balance.
Cards show brand, last four, and expiration. Bank accounts show bank name and last four. Status should be Verified before you rely on it. Bank accounts may sit in Processing or Confirming until verification finishes.
When you are viewing a single account on the Ledger tab, click the Auto-Pay badge to turn auto-pay on or off for that account. Auto collection (below) only charges accounts that have auto-pay enabled and at least one payment method.
Manual Tuition
The Manual Tuition tab is for a student whose tuition should not follow the usual section/global rules — a private lesson rate, a custom monthly amount, and similar cases.
Click Add Manual Tuition and set the student, a name, Monthly price, payment category, Responsible account, start (and optional end) date, and whether to Prorate partial billing cycles. Click Save Manual Tuition.
Deleting a rule does not change ledger items that already exist. Price overrides on an enrollment also do not change tuition during cycles covered by a manual-tuition rule.
Refunds
On a posted payment row, choose Refund. You get two modes:
| Mode | What happens |
|---|---|
| Start a Refund | Sends money back to the original card or bank via Stripe. Only available when the payment was collected that way. This cannot be undone. |
| Log Refund | Record-keeping only. No money is sent. Use this when you already refunded cash or wrote a check. |
Check the paid charge rows to include, enter how much to refund on each (up to Refundable), and submit.
Manage Balances
Open Manage Balances from Payments (or search for it). This is the studio-wide view of who owes what, who has leftover credit, and who said they would pay later.
There are three top-level tabs: Collect Balances, Manage Credits, and External Payments.
Collect Balances — Manual Collection
Lists accounts (not households) with a collectible balance.
You can filter:
- Payment categories to collect — only charges in those categories. Leave empty for all.
- Only include items that are due — skip charges whose due date is still in the future.
Household unallocated payments are applied oldest-first before anything is charged, so you will not double-collect money that is already sitting as credit.
Each row shows household, account, Balance, and whether you can charge them:
- Check Charge account to include them.
- Auto-pay disabled or No payment methods means you cannot collect from here until that is fixed on the household.
- Notes become the payment note on the charge. Set all notes fills the same note on every selected account.
Use Select All / Clear All, then Collect All Selected Balances. Confirm the table, type the total amount exactly, and click Process Payments. You can leave the page while it runs, but you will lose the live success/pending/failed counts if you do.
Refresh afterward to see anyone who is still unpaid (failed cards, and so on).
Collect Balances — Auto Collection
Configure rules that charge eligible accounts on a schedule, instead of clicking through Manual Collection.
Click Add Rule, then set:
- Active
- Day of Month
- Collection Time (studio local time)
- Payment Categories — leave empty to collect all categories
Click Save. Edit a rule later from the table.
Only accounts with auto-pay on and a usable payment method are charged. Auto Collection Logs is the history of those runs.
Manage Credits
Lists accounts that have unallocated payment or credit sitting on them — money or studio credit not yet pointed at a specific charge.
Click a row to expand the individual payment/credit lines. Columns:
- Allocatable — how much can still be applied to unpaid charges
- Unallocated — how much is not yet tied to a charge
From here you can:
- Reconcile on one payment — preview applying it to the oldest unpaid charges, then Apply
- Reconcile Account — same idea for every unallocated payment on that account
- Bulk Reconcile Credits — auto-reconcile every account currently listed
- Bulk Add Credit — download the CSV template (
Student Name,Household Name (optional),Credit,Note), fill it in without changing the header or column order, upload it, confirm the account on each row (primary is the default), then Add Credit(s)
Reconciliation uses oldest unpaid charges first. Leftover stays unallocated.
Your studio can also auto-reconcile after daily posting (a payment setting). Manual reconcile is for when you want to do it now, or when something was left unallocated on purpose.
External Payments
These are charges a parent marked as pay later at checkout (cash, check, or another offline method you allow). Rows whose due date has passed are highlighted.
This tab is a to-do list: when the money actually arrives, Log Payment on that household and allocate it to the charge.
Bulk Charges
Bulk Charges (under Payments) posts the same charge to many people at once — a recital fee, a costume deposit, a team jacket.
- Click Create Bulk Charge.
- Enter Description, optional Notes, Charge Amount, Payment Category, Post date, and Due date. Tax is calculated for you.
- Choose recipients By enrollment, By student, or By household, then by a list or by tags.
- Preview the generated items. Remove anyone who should be skipped.
- Click Add Charges.
Open the bulk charge later to see every ledger item it created. Collect takes you to a collection screen for only the remaining unpaid items from that bulk charge. Deleting the bulk charge record does not automatically unwind every ledger item — treat delete carefully.
Related
- Managing Enrollments — how tuition gets on the ledger when you enroll, drop, or move a student
- Pricing a Section — tuition, drop-in prices, and responsible accounts
Collecting Auto-Pay Payments
Auto-pay means EnrollmentHive charges a family’s saved card or bank account on a schedule you set, instead of you collecting each household by hand.
It is always opt-in per account. Turning auto-pay on does not charge anyone by itself. Collection only happens when:
- a collection rule fires, or
- you run Manual Collection from Manage Balances and check Charge account
This page covers turning auto-pay on, making sure a payment method is ready, setting those rules, and what to do when a charge fails. For posting charges, logging cash, and the rest of the ledger, see Charges and Balances.
Households vs Accounts
Auto-pay does not live on the household or on the student. It lives on an account.
A household is the family: students, address, and the people who can log in.
An account is one of those people as a billing identity. Payment methods, the auto-pay switch, and the running balance all belong to that account.
That split matters for auto-pay:
- Two parents in the same household can each have auto-pay on or off. Mom’s default card will not pay Dad’s balance.
- A scholarship household can have auto-pay on its own account, while the family pays everything else themselves.
- You collect one account at a time. There is no household-wide auto-pay toggle.
On the household Ledger tab, Viewing billing for lets you look at All accounts or one account. The Auto-Pay badge under the balance is what you click when a single account is selected.
What Has to Be True
An account is ready for automatic collection only when all of these are true:
- Auto-pay is enabled on that account.
- The account has at least one payment method (card or bank). Bank accounts should be Verified.
- There is a posted, unpaid balance that is due (due date is today or in the past). Upcoming tuition is not collected until it posts.
- An Active collection rule matches today’s date and time (for automatic runs), or you included them in Manual Collection.
If any of those are missing, Manage Balances will show Auto-pay disabled or No payment methods, and automatic collection will skip them.
Household unallocated credit (overpayments or studio credit not yet pointed at a charge) is applied oldest-first before anything is charged. You will not double-collect money that is already sitting on the household.
Payment Methods
Auto-pay uses the account’s default payment method. If there is only one method, that one is used.
From the studio
- Open the household and go to the Ledger tab, then Payment Methods.
- Click Add Payment Method, pick the Account, enter the card or bank details, optionally a nickname, and click Add payment method.
- On the method’s row menu, Set as default if they have more than one.
Methods belong to an account. Cards show brand, last four, and expiration. Bank accounts show bank name and last four.
From the parent portal
Parents go to Billing, then Payment Methods (or Manage Payment Methods). The page says the default method is what auto-pay will use. They can Add payment method, Set as default, or delete a method.
If your studio requires a payment method on file, they cannot delete their last one. They will need you to remove it.
Checkout also reminds them that saving a method can be used later for auto-pay if their account is enrolled.
Turning Auto-Pay On or Off
From the studio
- Open the household Ledger.
- Set Viewing billing for to the account (not All accounts).
- Click the Auto-Pay badge under the balance. It toggles between Enabled and Disabled.
When you are viewing all accounts, the badge only shows how many accounts have auto-pay on. It does not toggle anything.
You need permission to collect payments to change this.
From the parent portal
On Payment Methods, under Payment Settings, they check Enable Auto-pay (“Allow us to collect from your default payment method automatically”) and click Save.
Locking the parent toggle
In Organization Setup, under billing Payment Settings, Do not allow accounts to control Auto-Pay settings stops parents from changing the checkbox. They see a note to contact the studio. You can still toggle auto-pay from the household ledger.
Use this when you want auto-pay required (or forbidden) and do not want families flipping it themselves.
Collection Rules
Rules are what actually run auto-pay. Set them on Manage Balances → Collect Balances → Auto Collection.
- Click Add Rule.
- Turn Active on when you are ready for it to run.
- Set Day of Month (1–31) and Collection Time (studio local time).
- Optionally restrict Payment Categories. Leave empty to collect every category.
- Optionally check Notify staff 24 hours prior to collecting.
- Click Save.
Edit a rule from the table. In the edit flyout, Delete Collection Rule removes it. That cannot be undone.
How a rule matches the calendar:
- Time is your studio timezone, not UTC.
- If you pick day 31 (or another day that some months do not have), the rule runs on the last day of that month. A “31” rule runs on February 28 or 29.
- Only one auto-collection run starts in a given hour. If two active rules share the same day and hour, the older rule is the one that runs. Give rules different times if you need more than one pass (for example, tuition at 8:00 AM and costume fees at 9:00 AM).
Automatic collection always behaves like Only include items that are due. Charges with a due date still in the future are left for a later run.
Posted charges that are due, in the selected categories, after unallocated credit is applied, are what get charged. The payment on the ledger is described as Payment (Auto-Pay).
Staff notification (if you enabled it) is an in-app event about 24 hours before the rule, with the scheduled time and payment categories. That is separate from the email families get when new items post to their balance.
Manual Collection (Same Idea, On Demand)
Manage Balances → Collect Balances → Manual Collection is the “run it now” version of auto-pay.
You can filter by Payment categories to collect and Only include items that are due. Unallocated household payments are still applied oldest-first before charging.
Each row is an account. Check Charge account for people you want to bill. Select All only includes accounts that can actually be charged (auto-pay on and a payment method). Type a Payment note if you want the same note on every selected charge, or Set all notes.
Click Collect All Selected Balances, confirm the table, type the total amount exactly, and Process Payments.
This is useful after a failed auto-run, for a one-off tuition date, or when you want to collect before the next rule fires. It is not a substitute for turning auto-pay on — accounts with auto-pay off still cannot be charged from this table.
After a Run: Logs and Failures
Auto Collection Logs (from the Auto Collection tab, or Back to Collect Balances from the logs page) lists each automatic run:
- When it ran
- Which rule (day and time)
- Categories
- How many accounts were Attempted, Enqueued (tried to collect), Skipped, and Failed
- Total amount enqueued
Click a run to expand each account:
| Status | Meaning |
|---|---|
| Tried to collect | A charge job was queued for their default method |
| Skipped - Auto-pay unavailable | Auto-pay off or no payment method |
| Skipped - No due items | Nothing due in the rule’s categories after credit |
| Failed to collect | The charge could not even be queued; the Error column has detail |
A queued charge can still fail later at the processor (expired card, insufficient funds). Those show as failed payments on the household Payments tab and in Payments.
When an automatic payment does not go through, the account can get a Payment failed email (if that operational email is enabled in setup). They will need a new method, a different default, or you can Collect Payment on the household once the method is fixed.
Emails Families See
When new tuition or fees post to an account, they can receive a New balance due email. That email tells them:
- the new items
- that the balance will be processed on the due date if Auto-Pay is enabled
- that the default payment method (or their only method) will be used
- that a credit-card surcharge may apply if your studio charges one
- to pay by the due date if auto-pay is off
That email is about items posting, not about the collection rule clock. The rule is what actually charges them.
Studio Settings That Affect Auto-Pay
In billing Payment Settings:
| Setting | Effect |
|---|---|
| What time of day should upcoming items be posted? | When upcoming tuition becomes a real balance. Auto-pay can only collect after this. |
| Automatically apply unallocated credits to unpaid charges after daily posting | Points leftover credit at charges so auto-pay has less (or nothing) left to collect. |
| Do not allow accounts to control Auto-Pay settings | Locks the parent Enable Auto-pay checkbox. |
| Require having a payment method on file to checkout | Families must save a card or bank at registration. Helpful if you want auto-pay ready from day one. |
| Charge surcharges on credit-card transactions | Auto-pay on a credit card can add that surcharge. Debit, prepaid, and bank accounts are not surcharged. |
Connect Stripe on this same setup page. Auto-pay cannot run without a connected processor.
Related
- Charges and Balances — household ledger, collecting one family, credits, and Manage Balances
- Pricing a Section — responsible accounts and how tuition gets onto a balance
- Managing Enrollments — enrolling and dropping, which creates or removes upcoming tuition
Taking Attendance
Taking attendance is very easy in EnrollmentHive.
To view the attendance sheet for a session, there are three places you can go:
- The Schedule tab
- Your Dashboard
- The section’s schedule tab
The easiest place to go is the Schedule tab. This tab gives you a weekly view of everything going on at the studio. To find the class you want to take attendance for, you might need to click “Only Me” to filter down the entries if you have a lot of them. When you found the session you want to take attendance for, simply click it.
The Attendance Page
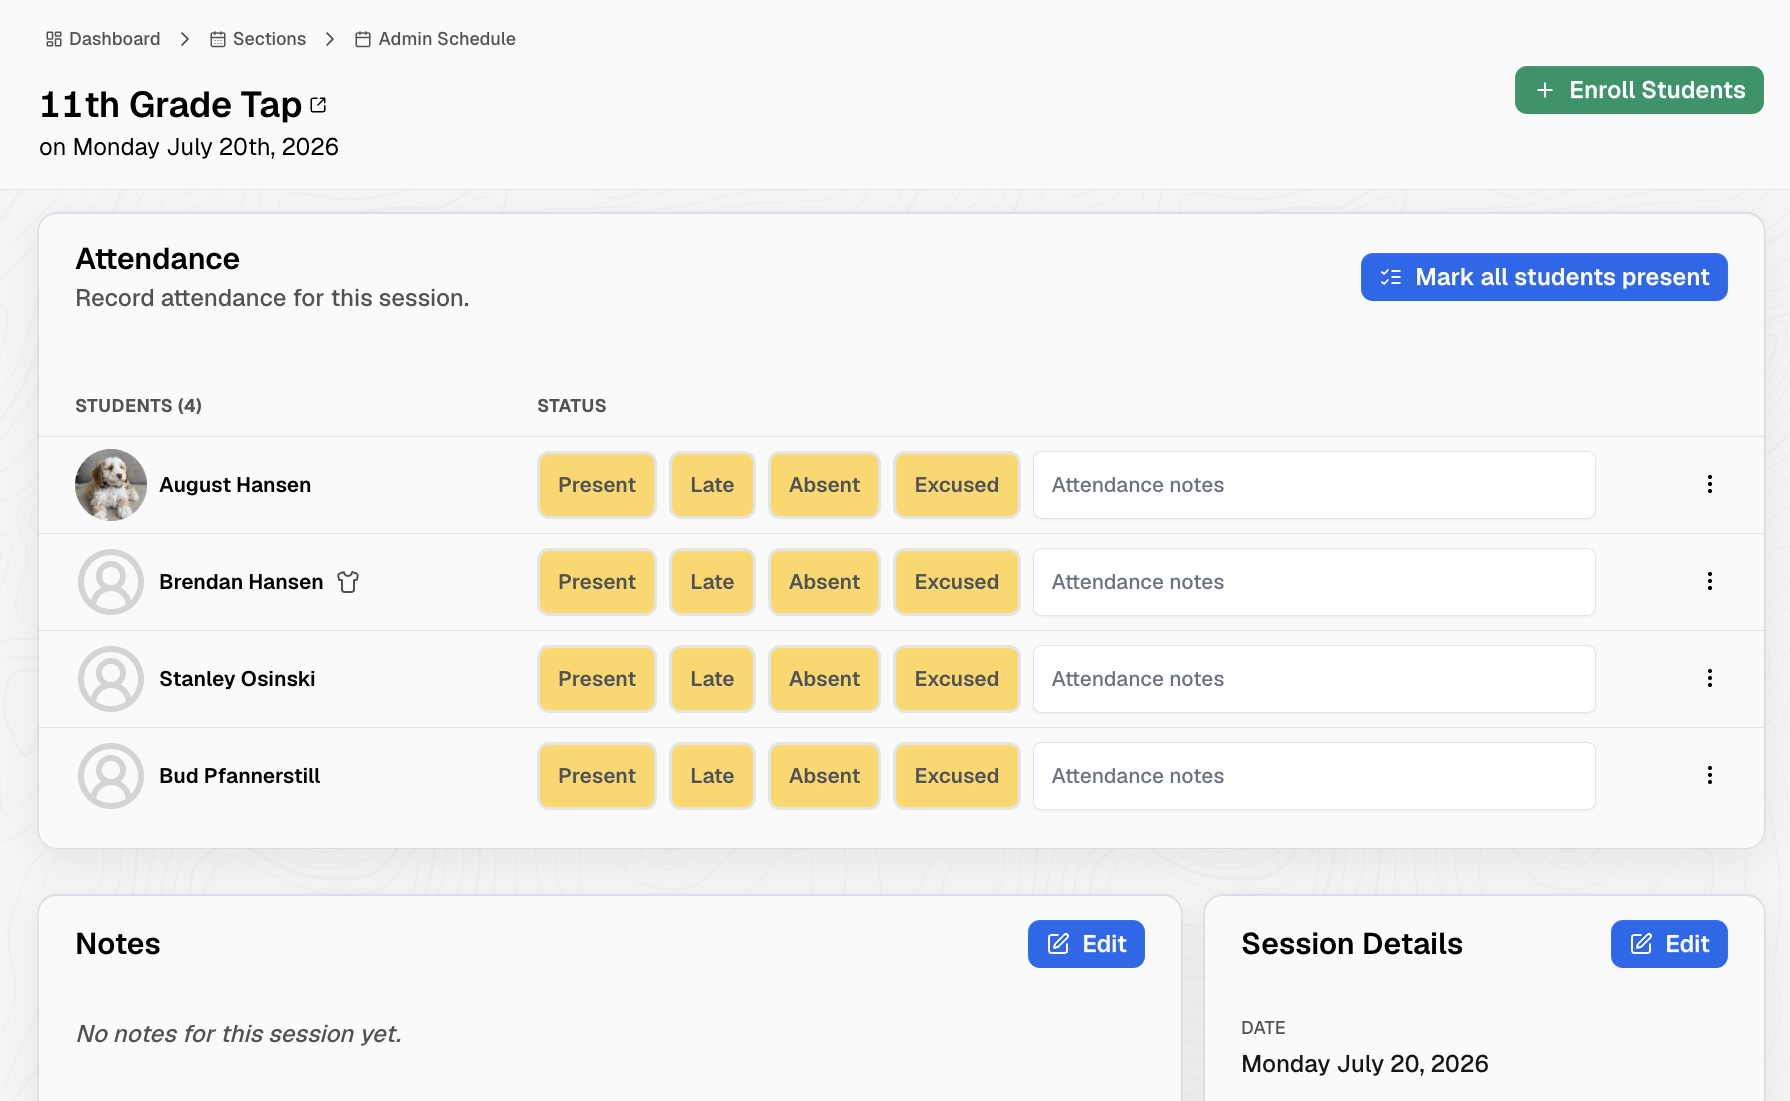
On this page, you can easily click or tap the buttons to mark each student as present, late, absent, or excused.
You can also make any notes about their attendance, though that textbox usually gets filled out by the parent when they report an absence.
If all students are present, you can simply click the “Mark all students present” button and every student will be marked as present.
You can make any notes on this page for lesson plans, or substitute notes if you are going to be absent.
You can also quickly take any notes on any of the students by using the three dots on the student line, and clicking “View Notes”. From here you can make and view notes in any of your preconfigured note categories.
Handling a Walk-in
If your studio allows for walk-ins, you can use the “+ Enroll Student” button in the top right corner to enroll a student as drop-in for this session.
In the pop-up, you can select the student from your existing list of students. Alternatively, if they are a friend/relative of one your students you can select “Visiting Student” and log the information about the student. This will create a “Visitor Student” profile under the selected household and bill the primary account on the selected household.
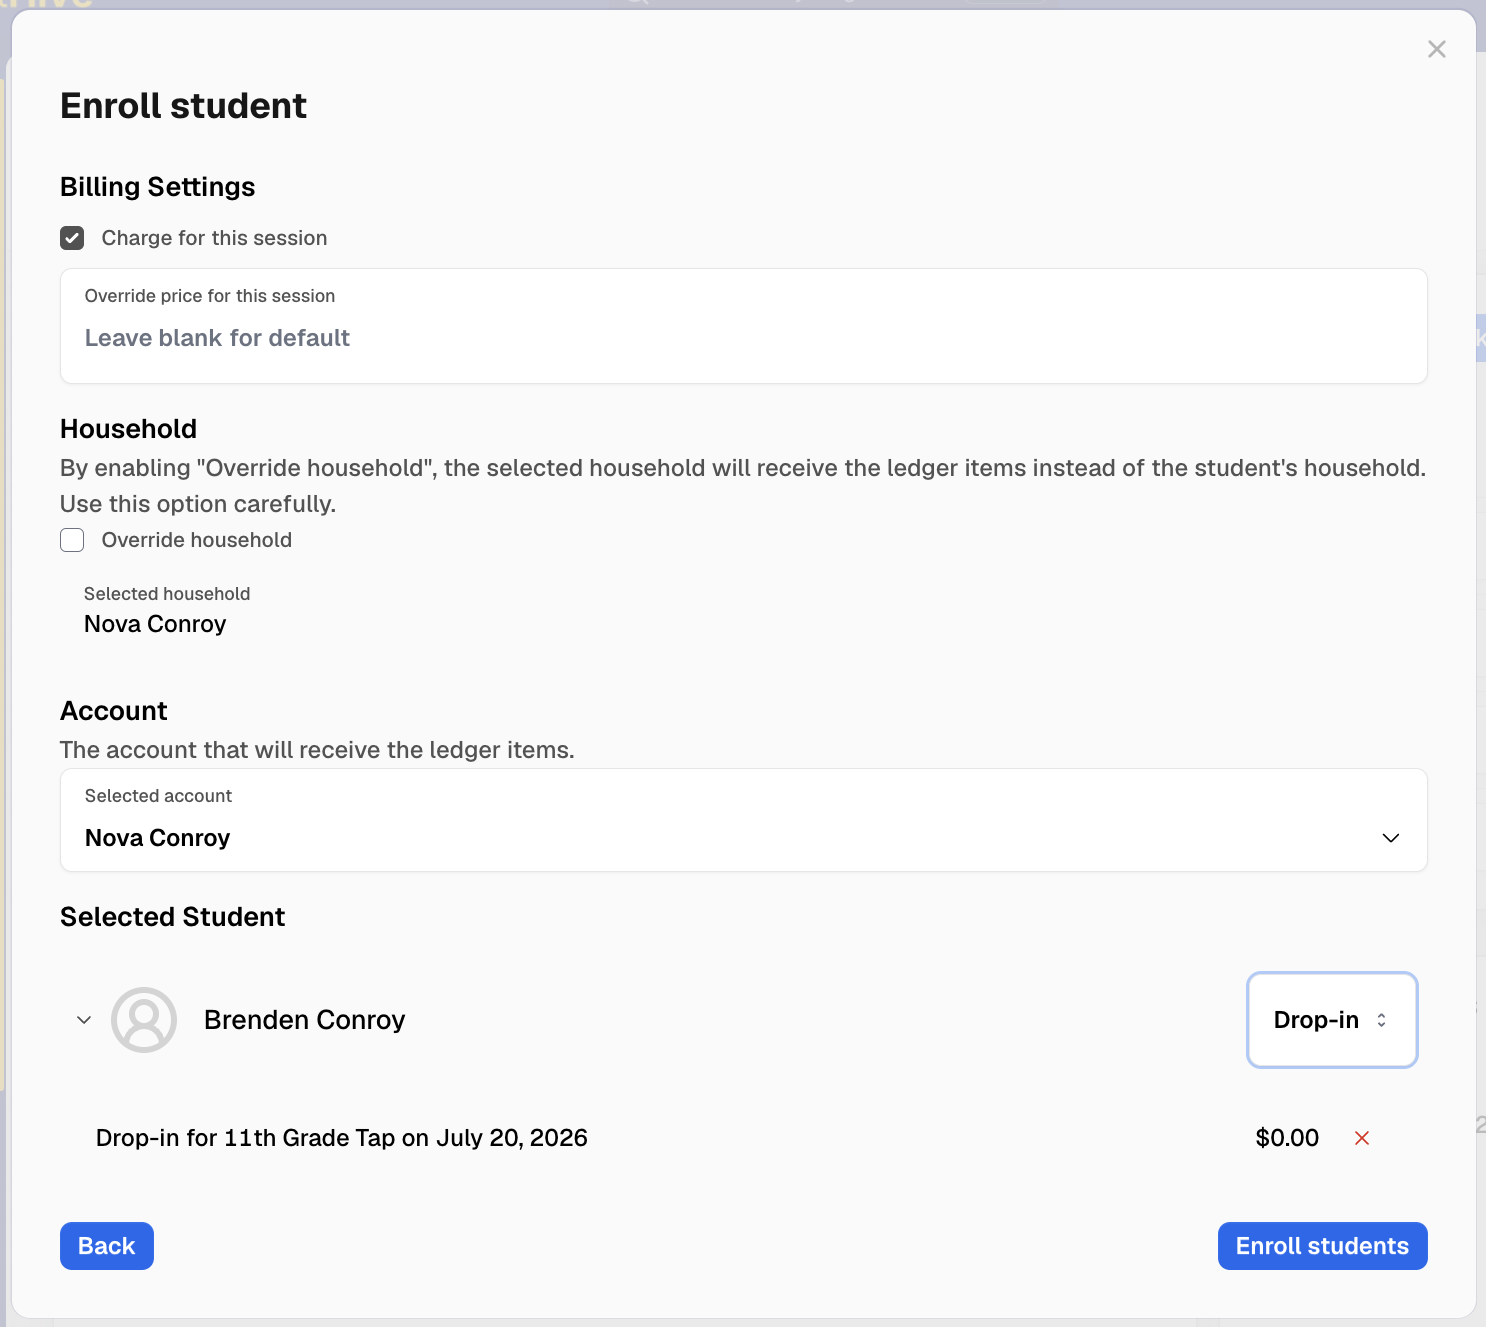
Once you’ve chosen the student, you can choose how/if to bill for this drop-in/trial.
You can override the session price, change which household/account is being billed, or even remove the drop-in charge entirely.
When ready, click the “Enroll students” button to enroll them for this session.
As a note, you can do this “drop-in” enrollment even on sections that do not have drop-ins enabled.
Sending and Scheduling Emails
Studio messages in EnrollmentHive are notifications. A notification can go out as email, as an in-app message on the parent dashboard, or both. Most studio-wide mail starts on Communications. A one-off to a single family starts on that household.
This is different from alerts, which sit on every parent dashboard until they expire. It is also different from automatic emails such as payment receipts and upcoming bills, which you edit under organization billing/communications setup.
Emails go to accounts (people with a login and an email address), not to students. See households vs accounts if that split is new.
Communications
Open Communications. Across the top you will see:
- Notifications — drafts, sent mail, and activity
- Recipient Lists — saved groups you reuse
- Templates — reusable message bodies
- Alerts — dashboard banners (not email)
- Parent Live Chat — in-app chat, not email
The Notifications tab shows last-30-day stats (emails sent, unopened, bounced/errored), Draft Notifications, then Sent Notifications / All Notifications.
Compose a Notification
- On Notifications, click New.
- Choose Create new (blank draft) or Create from template (picks a General Notification template and copies its body).
- That opens Edit Notification. The form auto-saves as you type; Save / Save Changes also writes the draft.
| Field | Details |
|---|---|
| Internal title | Name in your drafts and sent list. Parents do not see this. |
| Tags | Optional tags so you can filter sent mail later. |
| External Title / Email Subject | Subject line of the email and the title parents see in-app. |
| Reply-to email address | Where replies go. Leave blank to use the studio contact email. |
| Recipients | Who should get it. See Adding recipients. |
| Message body | Rich text. You can insert merge fields such as Account First Name and Household Last Name. They fill in per recipient at send time. |
| Send as in-platform notification | Always on. Parents also see it in their dashboard notification list. |
| Send as email | Uncheck to deliver in-app only. |
| Operational vs Marketing | Operational is for current families and class information. Marketing is for anyone, including people who are not active students. Accounts can opt out of either type; the preview flags anyone who will not receive the email. |
When the draft looks right, click Preview notifications at the bottom. Nothing is sent until you confirm there.
Adding Recipients
On a draft, click Add Recipients. Choose how to add people, pick the items, then Add.
| How | Who is included |
|---|---|
| From recipient list | Everyone currently on that saved list (see below). |
| By section | Every account in the household of a student with a recurring enrollment in those sections. Drop-ins and trials are not included. |
| By season | Same idea, for every section in the season. |
| By sections with tag | Recurring enrollments in sections that have those tags. |
| By households with tag | Every account on households with those tags. |
| By students with tag | Every account on households of students with those tags. |
| By instructor | The instructor’s own login accounts — not the parents in their classes. Use By section for that. |
| By searching for specific accounts | People you pick by name/email. |
| All accounts | Every non-visitor account in the studio. |
You can add several rules. View List expands the chips into names, emails, and a Reason (for example, “Has student in ‘Monday Ballet’”). Use the X on a chip to remove that rule or person.
The list is resolved when you send. A saved recipient list tied to a section will include whoever is enrolled at send time, not whoever was enrolled when you first attached the list.
Adding a section emails all parents (accounts) on those students’ households, not only the responsible account for the class.
Recipient Lists
Use a recipient list when you mail the same group often (all 2026–27 families, competition team, waitlist tags, and so on).
- Open Communications → Recipient Lists.
- Click New List, enter Recipient List Name and Description, then Create List. Recipients are added after create.
- On the list, click Edit.
- Under Add Recipients, pick a rule (same options as on a notification, except you do not nest another list here), then Add.
- Click Save.
The Preview Recipients table is a snapshot. It updates as people enroll or drop. Search it by name or email. Reason explains why each account is on the list.
Remove a section, tag, or person with the X on that chip in the edit flyout, then Save. Delete Recipient List in Danger Zone removes the saved list; it does not unsend mail.
When composing a notification, From recipient list attaches that living list as one recipient chip.
Templates
Open Communications → Templates. Click New Template, then set:
- Title — your name for the template
- Type — what the template is for
- Body — rich text, with merge fields that match that type
Click Save. You can Duplicate Template from the menu. Delete template is on the list row.
Types you will use day to day:
| Type | Where it is used |
|---|---|
| General Notification | Compose a notification (Create from template) and Send Notification on a household. |
| Class Cancelled | The cancel-class flyout on a session. |
| Household Invite | Inviting a parent to set up their login. |
| Audition Result | Audition decision messages. |
| Automated Email | Automations that send mail. |
Payment receipts, upcoming bills, and failed auto-pay emails are system templates. Those are edited in organization setup, not on this Templates tab.
For blast mail, create a General Notification template, then New → Create from template when you are ready to send. Household send only offers General Notification templates as well.
Preview, Send, or Schedule
Preview notifications shows each recipient on the left and a personalized body on the right. Click a name to see their merge fields filled in. An orange warning means that account has opted out of this Operational or Marketing category and will not get the email.
Under Ready to send?:
- Send notification now → confirm → Send Notifications
- Schedule notification → pick Schedule for (studio local time) → Schedule Notification
Scheduled drafts show a Scheduled Notification card with the time. Cancel Scheduled Notification returns it to a normal draft.
After a send, the notification moves to Sent Notifications. Open it to see delivery activity (sent, delivered, viewed, bounced, spam, opted-out, errors). You can Re-send Emails to a subset, or Add Recipients to send the same message to more people immediately.
Duplicate Notification copies Body only or Body and recipients into a new draft.
Send from a Household
For one family (a balance reminder, a costume note, a follow-up):
- Open the household.
- Go to the Communications tab.
- Click Send Notification.
| Field | Details |
|---|---|
| Recipients | Accounts in this household. The primary account is selected by default. You can include more than one. |
| Notification Title | In-app title. |
| Email Subject | Email subject line. |
| Template | From scratch, or a General Notification template (fills the message). |
| Message | Rich text with the same merge fields as a general blast. |
| Send as email | On by default. Uncheck for in-app only. |
Click Send Notification. It sends immediately — there is no separate preview or schedule step. The household Communications tab lists what went to this family, who received it, latest activity, and whether it went as email. Click a row for that recipient’s detail.
Accounts that have never been invited to log in are skipped.
Related
- Setting Up Alerts — dashboard banners for every parent, not targeted email
- Charges and Balances — households vs accounts
- Collecting Auto-Pay Payments — automatic billing emails are system templates, not this composer
Setting Up Alerts
Alerts are studio-wide messages on the parent dashboard. Use them for snow days, recital reminders, registration opening, or anything every family should see when they log in.
They are not emails, and they are not targeted to one household. Every parent who signs in can see an active alert.
Staff Inbox notifications (absences, checkouts, auto-collection upcoming, and so on) are a different feature. This page is only the parent-facing alerts under Communications.
Where to Manage Them
Open Communications, then the Alerts tab.
The list shows each alert’s Title, Expires At, Last modified, and Is Displayed. Click a row to edit it.
Is Displayed is Yes when at least one display option is on and the expiration is still in the future. If it says No, parents are not meant to see it (expired, or both display checkboxes off).
Create an Alert
- Click New Alert.
- That creates a draft titled Untitled Alert and opens Setup Alert.
- Fill in the fields below and click Save.
- Cancel returns to the list without keeping unsaved edits (the draft row still exists until you delete it).
| Field | Details |
|---|---|
| Title | Name in the admin list so you can find the alert later. Parents see the message body, not this title. |
| Message Body | Rich text shown on the parent dashboard. Keep it short. You can add links, bold, and lists. |
| Banner at top of dashboard | Shows as a bar at the top of the parent dashboard, above Quick Actions. |
| Popup on dashboard after logging in | Opens a dialog when they land on the dashboard. They can dismiss it. |
| When should this alert expire? | Date and time in your studio timezone. After this, the alert stops showing. Leave it blank to keep it until you turn off the display options or delete it. |
You can check both banner and popup if you want the message in the bar and a dialog they have to close.
How Parents See Them
Alerts only appear on the parent dashboard (the home screen after login), not on registration, billing, or the public site.
Banners stack if more than one is active. They stay on the dashboard until the alert expires or you uncheck Banner at top of dashboard.
Popups open when they open the dashboard. Closing the dialog dismisses it for that visit; the next time they open the dashboard, it can appear again until the alert expires or you uncheck Popup on dashboard after logging in.
If several alerts are set as popups at once, only one popup is shown. Prefer a single popup, and use banners for anything extra.
Unsigned-waiver messages on the dashboard are separate from alerts. Those come from required waivers, not from this list.
Turning an Alert Off
You do not publish or unpublish with a status switch. To stop showing an alert:
- Uncheck Banner at top of dashboard and Popup on dashboard after logging in, then Save, or
- Set When should this alert expire? to a time that has passed, then Save, or
- From the Alerts list, open the row menu and Delete alert (you will be asked to confirm). Deleting cannot be undone.
If you want a message to run for a known window (for example, “Studio closed Monday only”), set the expiration when you create it so you do not have to remember to take it down.
Tips
- Write the body as if a parent is reading it on a phone. Lead with what they need to do.
- Put dates, times, and links in the body. The admin title is only for you.
- Do not rely on alerts for something only some families should hear. Send a notification or email instead when you need a specific list of households.
- Check Is Displayed after you save. If it is No and you expected Yes, confirm a display checkbox is on and the expiration is still in the future.
Related
- Collecting Auto-Pay Payments — staff can get an inbox notice 24 hours before auto-collection; that is not a parent alert