
Pricing Your Sections
There are a variety of ways to price your sections in EnrollmentHive to suite your business needs. You select how you want to price your sections on a section-by-section basis. This guide will walk you through the different ways and when you would want to use them.
One-time Payment
The simplest way to charge for your sections is through a one-time payment. This payment is due when the student enrolls in the class and is either paid at checkout or is placed on the responsible account’s balance when enrolled from the admin portal.
This pricing mode is best for camps or short duration classes where charging multiple times does not make sense.
To charge a one-time payment, set the Series Billing mode to “One-time Payment” when editing or creating a section. Then enter the total amount you want to collect in the “Tuition Price” field. You can optionally select “Prorate after the section starts” to automatically lower the price if someone signs up part way into the section. In addition to the tuition, you can also collect a “Registration Fee”. This may be useful if you have a policy of non-refundable registration fees, but you do refund tuition.
Global Tuition
To charge a recurring tuition amount every month, the easiest way is to use the Global Tuition pricing mode.
You will need to configure your global tuition settings in your Organization Setup under “Tuition”.
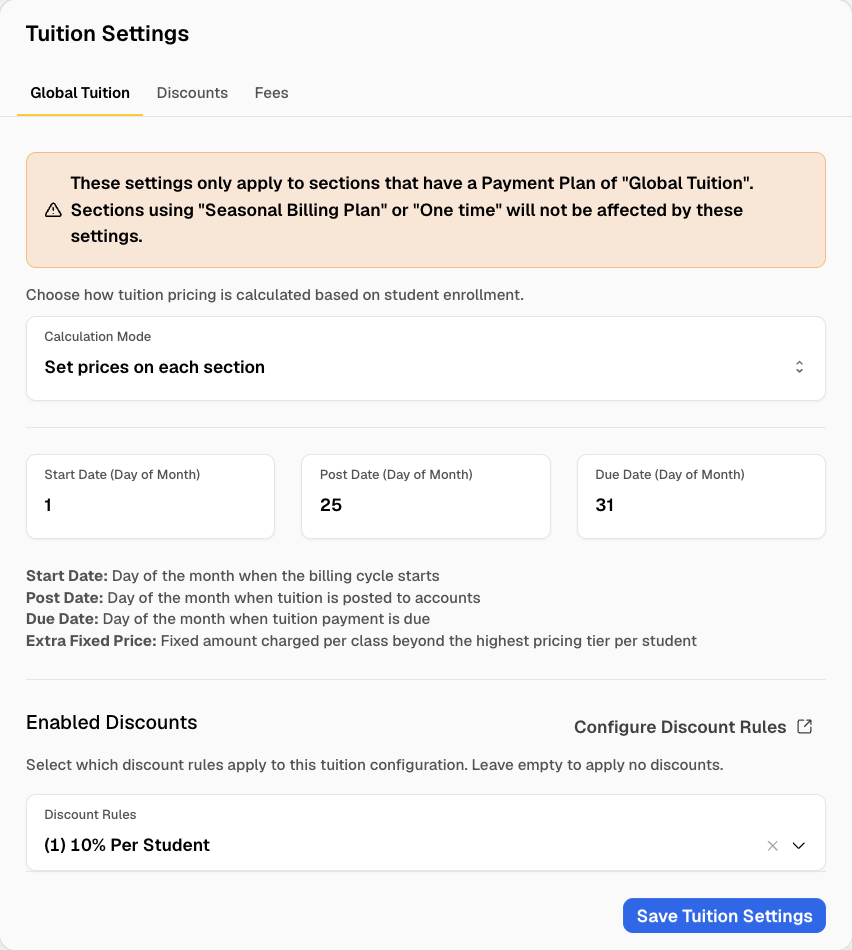
The most important setting here is the “Calculation Mode”. It tells the system how to calculate tuition for the sections using Global Tuition. There are three options:
| Mode | Description |
|---|---|
| Set prices on each section | System totals the “Tuition Price” of every section the account is responsible for. |
| By Number of Classes Per Week | System calculates the total tuition cost for an account by totaling the number of times all the enrollments it is responsible for meet in a week. Allows you to specify the pricing curve for how much a given number of classes is per month. Does not use the “Tuition Price” of the section. |
| By Number of Hours Per Week | System calculates the total tuition cost for an account by totaling the amount of time all the enrollments it is responsible for meet in a week. Allows you to specify the pricing curve for how much a given amount of time is per month. Does not use the “Tuition Price” of the section. |
In addition to setting up the calculation mode, you also set up when your billing cycles are. You set the start day of the billing cycle, the day the tuition posts, and the day the tuition is due.
For example, a start day of 1, a post day of 21, and a due day of 5 would mean: “Tuition runs from the 1st of one month, to the 1st of the next. Tuition is posted the 21st before the tuition start date, and is due the 5th of the month after it is posted”. For example, September tuition would run from September 1st to October 1st, would post on August 21st, and be due September 5th.
Global tuition only support monthly billing periods; if you need a more flexible solution, use Seasonal Billing Plans.
Finally, you can enable certain discounts to apply to global tuition, if your tuition is calculated by “Set prices on each section”. You cannot use discounts with the other calculation modes currently; we recommend building the discount into your pricing curve.
Seasonal Billing Plans
Seasonal billing plans are much like Global Tuition, but they give you more control over billing periods and allow you to offer multiple way to pay for a section.
To use seasonal billing plans, you will first have to create a “Season”. Go to the “Seasons” tab, then “+ New Sesaon”.
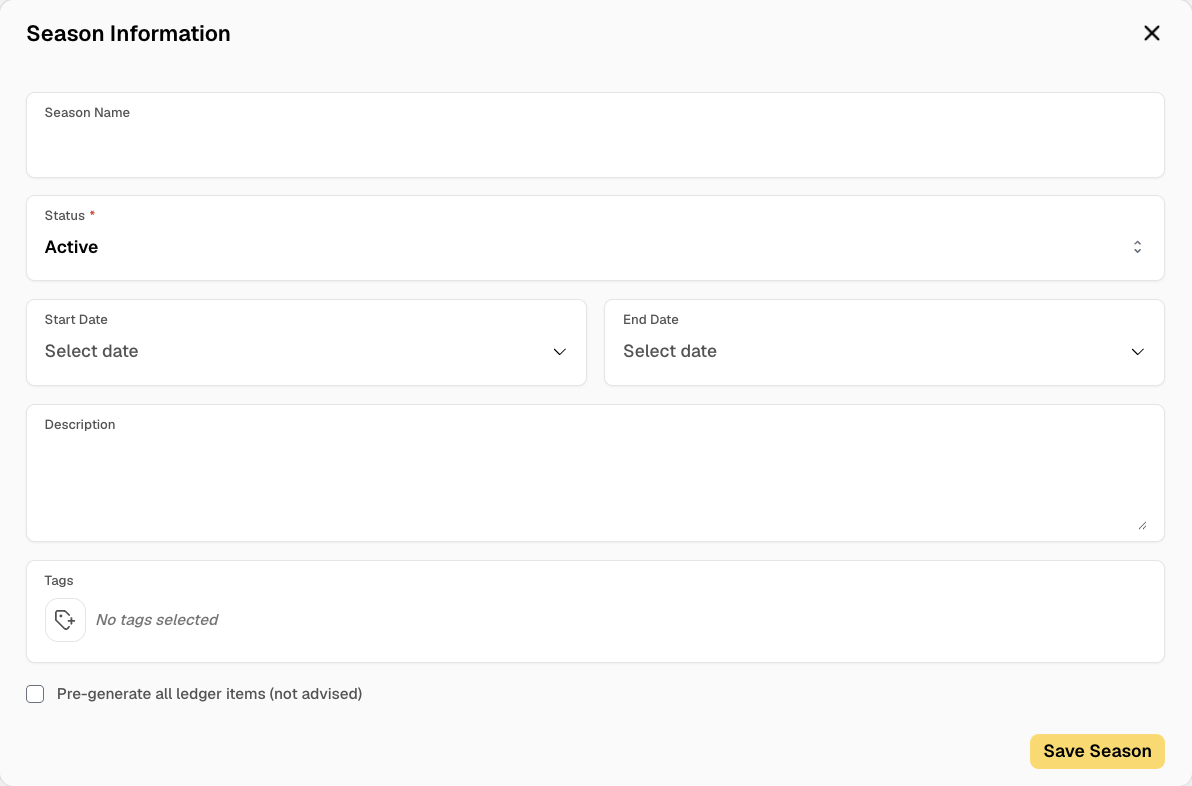
The only required field is the Season Name. All other fields are for your reference (when the season is and what kinds of sections it contains).
From within your new season, click the “+ Add Plan” button on the Billing Plans area.
Give your billing plan a short descriptive name, like “Monthly” or “One-time”. You can also choose if you want this plan to be offered at checkout to customers. This allows you to offer your customers a way to choose how they want to be billed for their classes, whether it be monthly, one-time, or even 3 equal payments throughout the year.
Just like the Global Tuition, you can configure how you want this billing plan to calculate the total tuition. See the section above for more details.
Finally, you configure your billing periods. You can either type these manually, or use the Generate Periods button to quick generate a full year’s worth of monthly tuition from which you can adjust.
Because you are directly creating these billing periods, you have more control than you do with Global Tuition. You can choose to prorate the amount if a student enrolls part way through a period. You can also choose a multiplier that is applied to the tuition to adjust for partial months or collecting multiple months at once.
This is best explained through examples. Here are a couple billing period configurations we have seen some of our studios using.
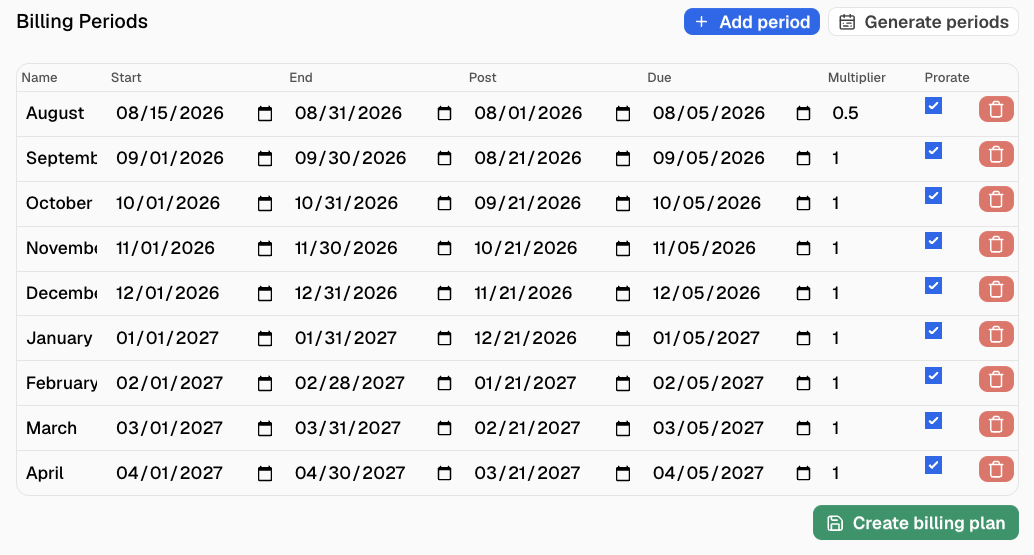
In this example, the students start halfway through August and the studio decided to reduce August’s tuition to compensate for that. They set the multiplier to 0.5 (or 50%) to multiply the calculated tuition by 50% for that period.
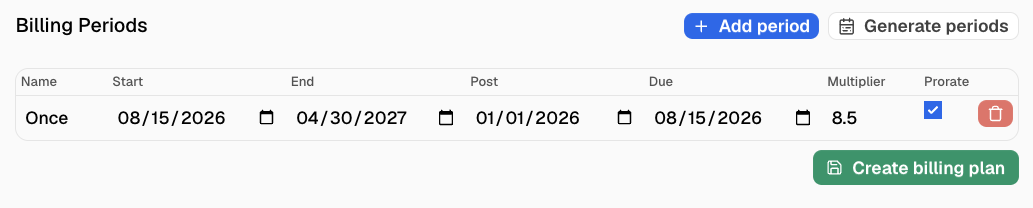
In this example, the studio is charging a one-time payment for the entire section. They have the due date as the first day of classes, but the post date as January 1st. This guarantees that when enrolling the first period will be posted and collected at checkout. They also set the multiplier to 8.5, which is for the 8 and a half months of class the payment is covering.
To use these billing plans, a section must use “Seasonal Billing Plans” for its series billing, and be part of the configured season.
Seasonal Billing Plans give you the most control over tuition pricing, but it is always a good idea to use the “Preview Earnings” button when configuring a section to make sure the total and billing periods are correct.
Section Packages
A section package enrolls a student in several sections at once. Families pick the package on the registration page (or you enroll them from the Packages tab), then they are placed in every required section plus any choice-group sections they selected.
Packages are a different idea from subscriptions and punchcards. Those cover drop-in visits. A package creates recurring enrollments in the bundled sections.
You choose how the bundle is billed with Pricing Mode:
| Mode | What families pay | How tuition is calculated |
|---|---|---|
| Package Price | One price for the whole bundle (plus an optional package registration fee) | The individual sections in the package are not billed on their own. Recurring tuition, global tuition, and seasonal charges on those sections skip enrollments covered by this package. |
| Individual Section Pricing | Whatever each included section already charges | No package-level price or package registration fee. Each section uses its own one-time, global tuition, or seasonal setup. |
When the mode is Package Price, you also pick a Payment Plan:
| Plan | When to use it |
|---|---|
| One-time Payment | Charge the Package Price (and optional registration fee) up front. You can still attach a season for reporting; that season does not change what is charged. |
| Seasonal Billing Plan | Split the package price across the billing periods on a season, the same way a section uses seasonal plans. A registration fee can still be charged once at checkout. Turn on Collects first payment at checkout if the first cycle should post immediately instead of waiting for the plan’s post date. |
Use Preview earnings on the package form to see the collection schedule. For package price, that is the package total. For individual section pricing, you get a schedule per included section.
A student can also be attached to a package after they are already in a section. If the package uses Package Price, attaching them covers that section so extra section tuition is not created.
For creating packages, choice groups, waitlists, and enrolling from the studio, see Section Packages.
Drop-ins
If your section allows for drop-ins (has a registration type of “Drop-in only” or “Series with drop-ins”), then you can charge per session a student attends.
To charge a drop-in fee, go to the Drop-in Billing area in you section, and set the “Drop-in Price” to the amount desired. This payment is due when the student enrolls in the session and is either paid at checkout or is placed on the responsible account’s balance when enrolled from the admin portal.
Subscriptions and Punchcards
“Subscriptions and Punchcards” are available as an add-on feature that is included in the Plus plan and above.
Punchcards allow your customers to buy a pass that gets them:
- A certain number of drop-ins punches
- Unlimited drop-ins for a certain amount of time
- A combination of the two: limited punchces with a time limit.
A punchcard does not use the drop-in price of the section. Instead, it allows for your customer to drop-in to any applicable section and use their punchcard as payment. You can restrict which sections a punchcard applies to when configuring the punchcard.
Subscriptions are much like punchcards, but they are renewed automatically while the customer has an active subscription. You can similarly restrict which sections are applicable to a subscription when configuring it.
Subscriptions allow you to offer “memberships”, where the customer can drop-in to unlimited classes a month and simply pay a month fee. Great for workout or technique classes.
You can configure Subscriptions and Punchcards in the “Passes” tab, or by searching for “Passes”.
Responsible Accounts
Every enrollment has a responsible-account, which is the account that is responsible for paying for the enrollment, and any other charges incurred for that enrollment (costume charges, late fees, etc).
By default, the responsible account is the account that went through the checkout process and enrolled the student. If the student was enrolled from the admin portal, it will be the primary account on the student’s household.
You can change the responsible account by going to the Enrollments tab on the student, clicking the three dots on the right side, and selecting “Edit Responsible Account”. In the pop-up, you can select the household and the account that is going to be responsible. The system will then move any unposted ledger items to the new account automatically. Any posted items will not be moved automatically and will need to be deleted and re-added to the new account.
The responsible-account system is very flexible and allows for complicated billing situations without any hassle. For example, a student might have a scholarship for a particular section they are in. In this case, you can create a household and account that represent the scholarship, and then change the responsible account of the student’s enrollment to be the scholarship account. The system will automatically bill the scholarship account for just that enrollment.